AWS HealthOmics에서 Annotation 작업 수행하기
AWS HealthOmics의 Analytics 기능을 활용하여 annotation작업을 수행할 수 있습니다.
준비물
- 입력 샘플 VCF
- Annotation할 정보 소스 VCF (예: ClinVar)
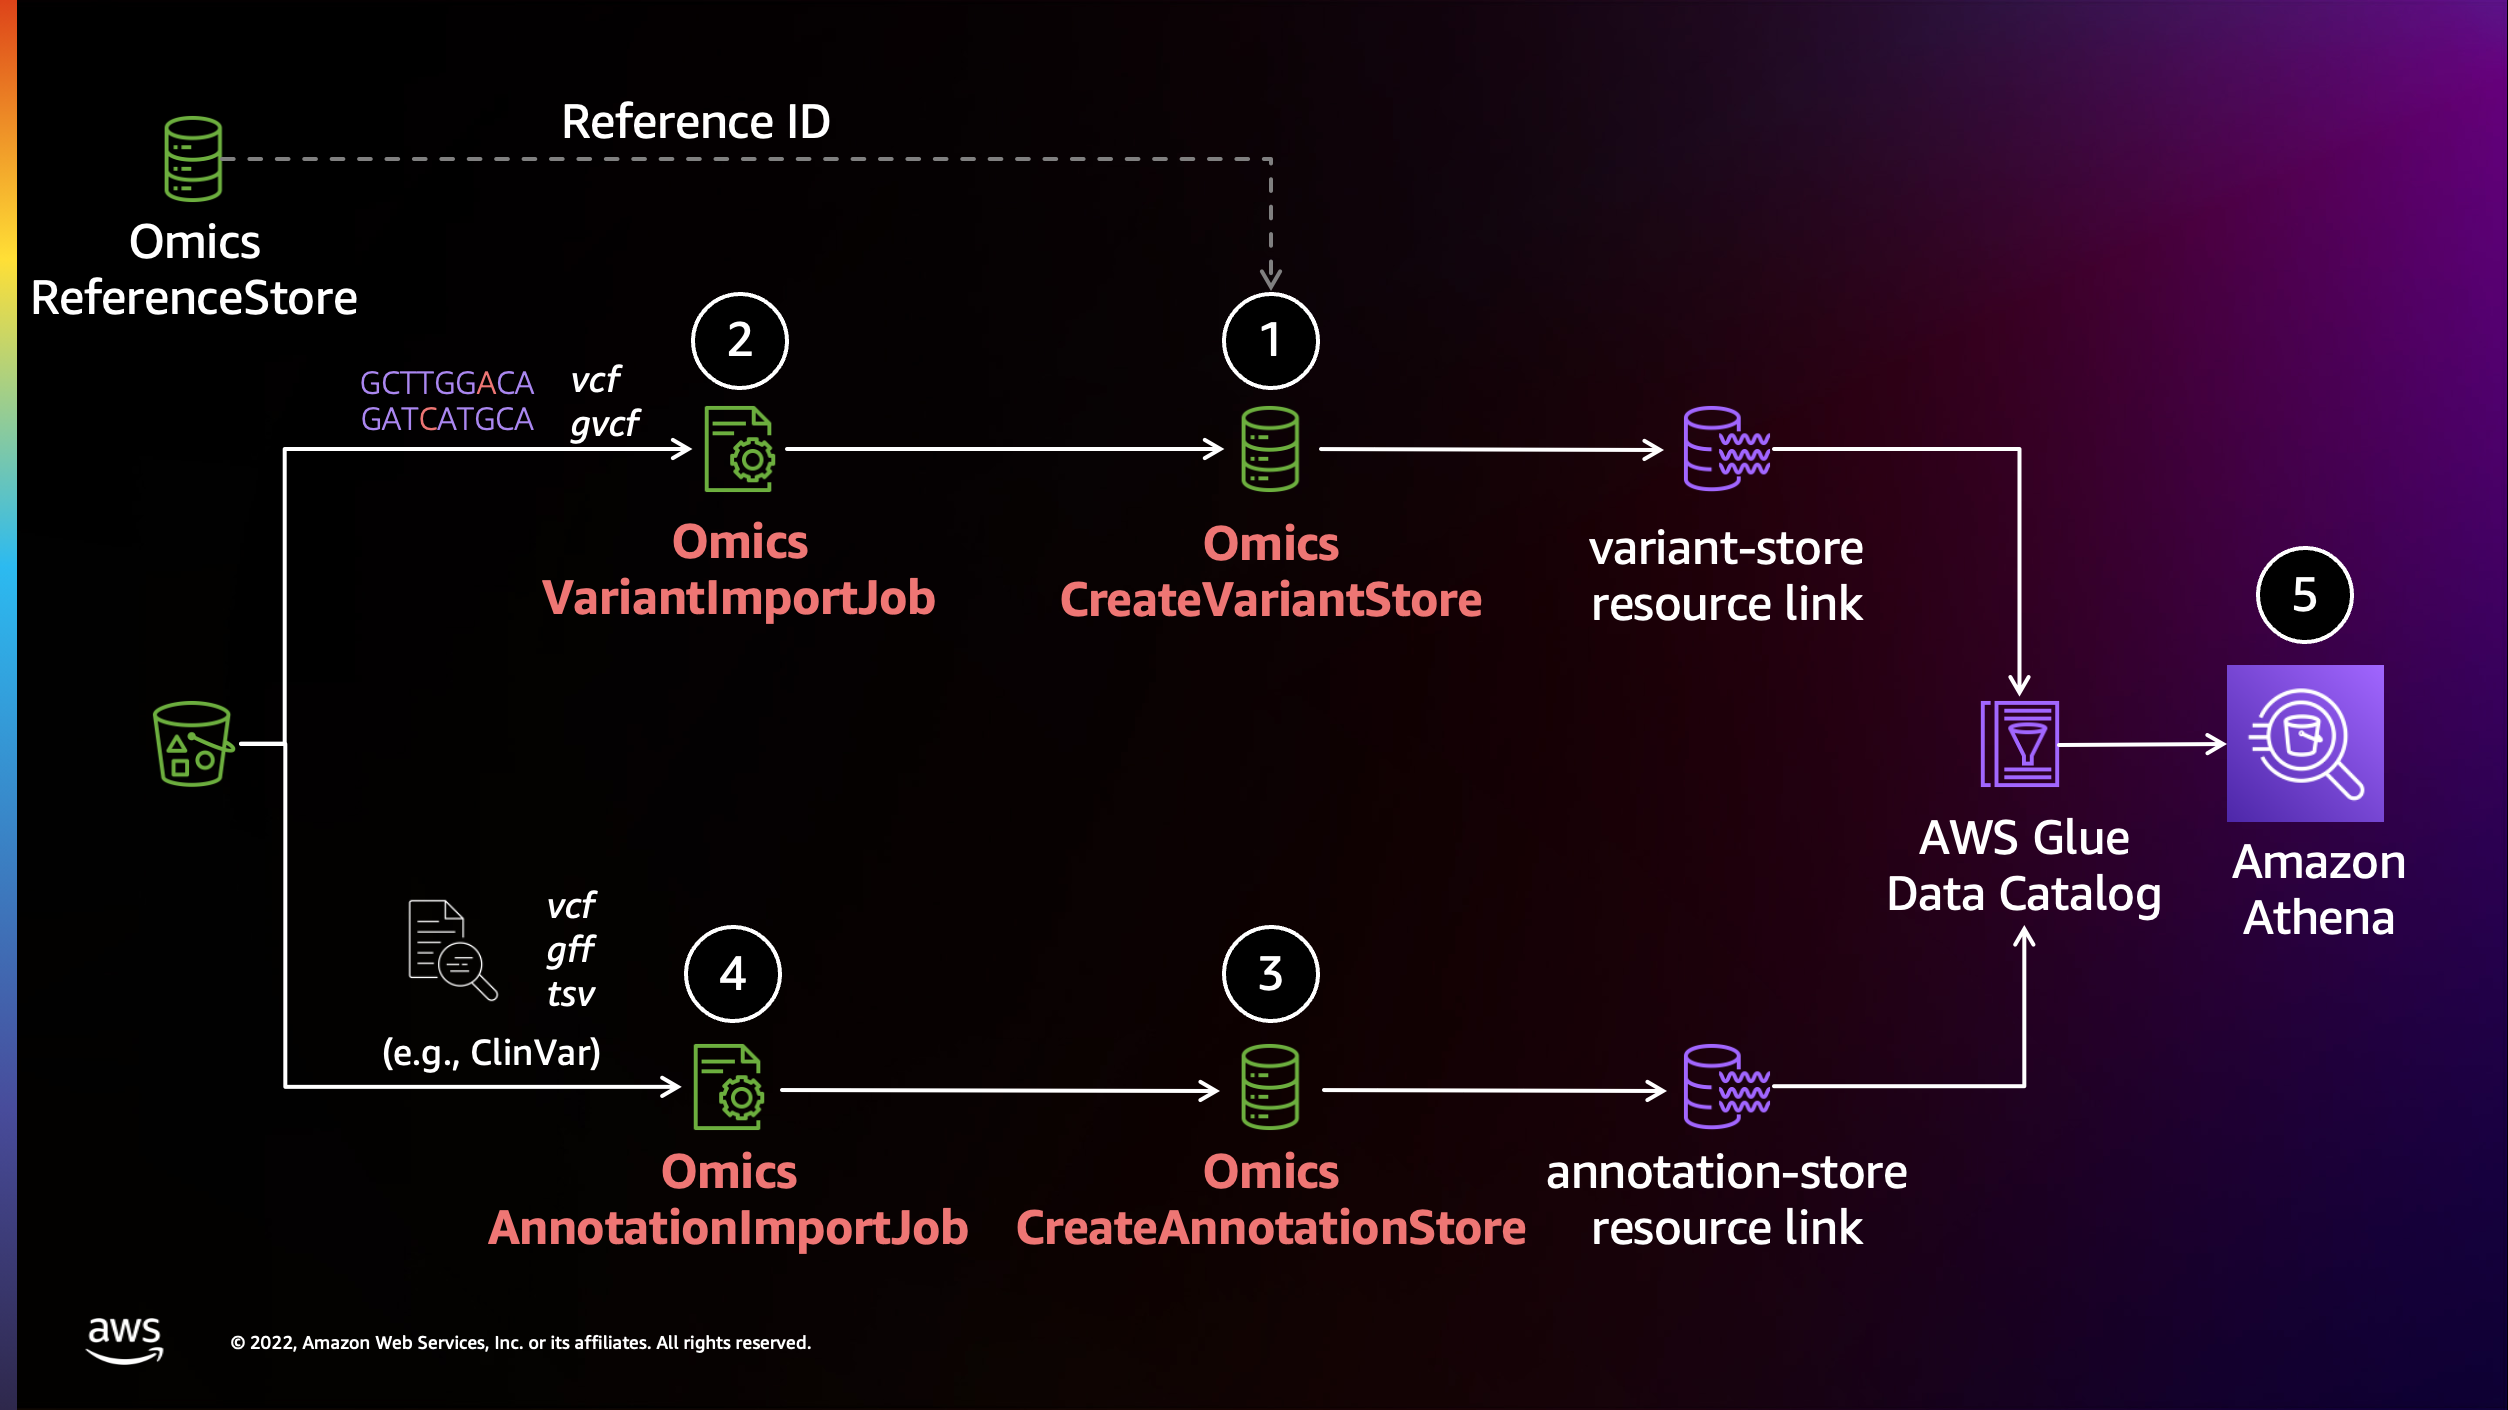
Variant stores
변이 스토어 생성
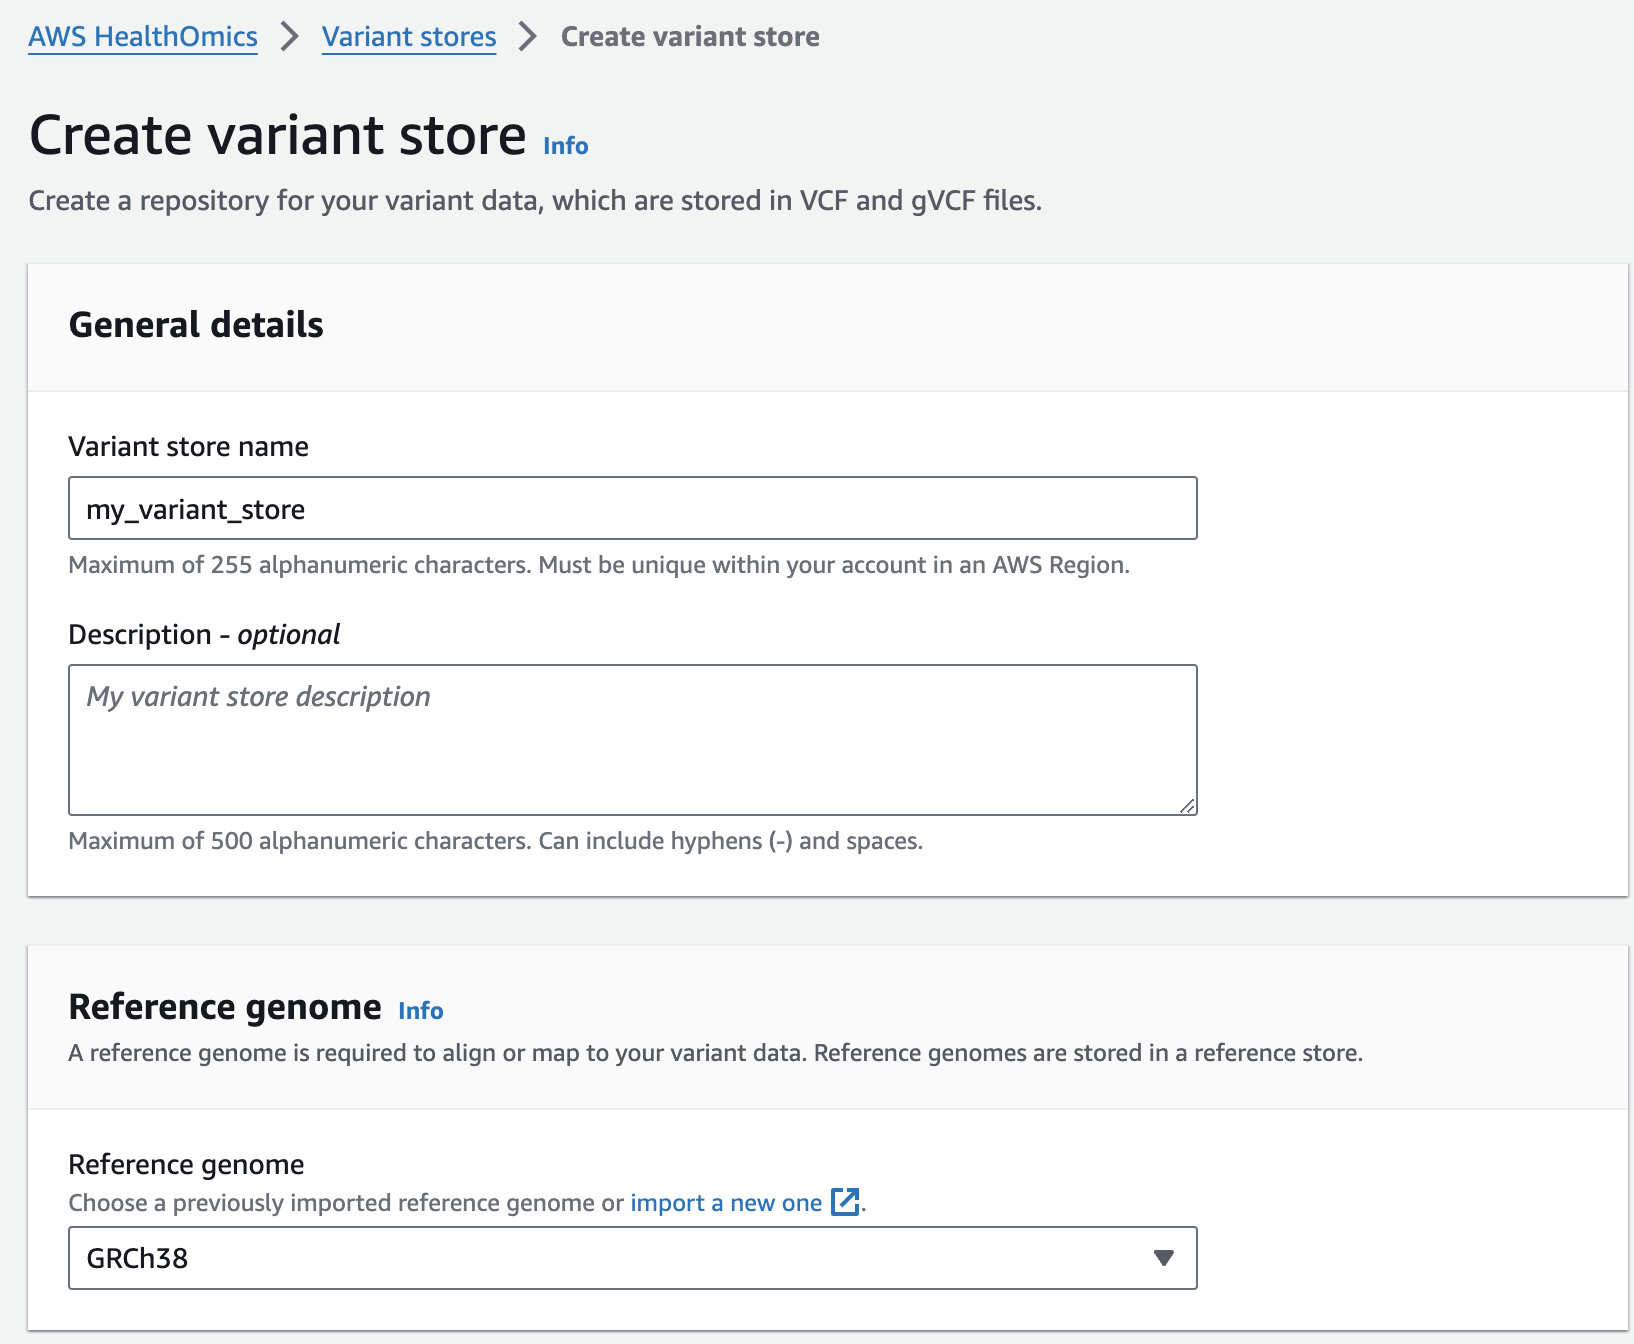
- From the AWS HealthOmics Console, navigate to Analytics > Variant stores
- Select Create variant store
- For Variant store name provide "my_variant_store".
- For Reference genome select "GRCh38" (this is a pre-provisioned reference, but you can alternatively select the reference you imported in the Reference Store part of the workshop)
- Finish with Create variant store
변이스토어에 샘플 VCF 파일 가져오기
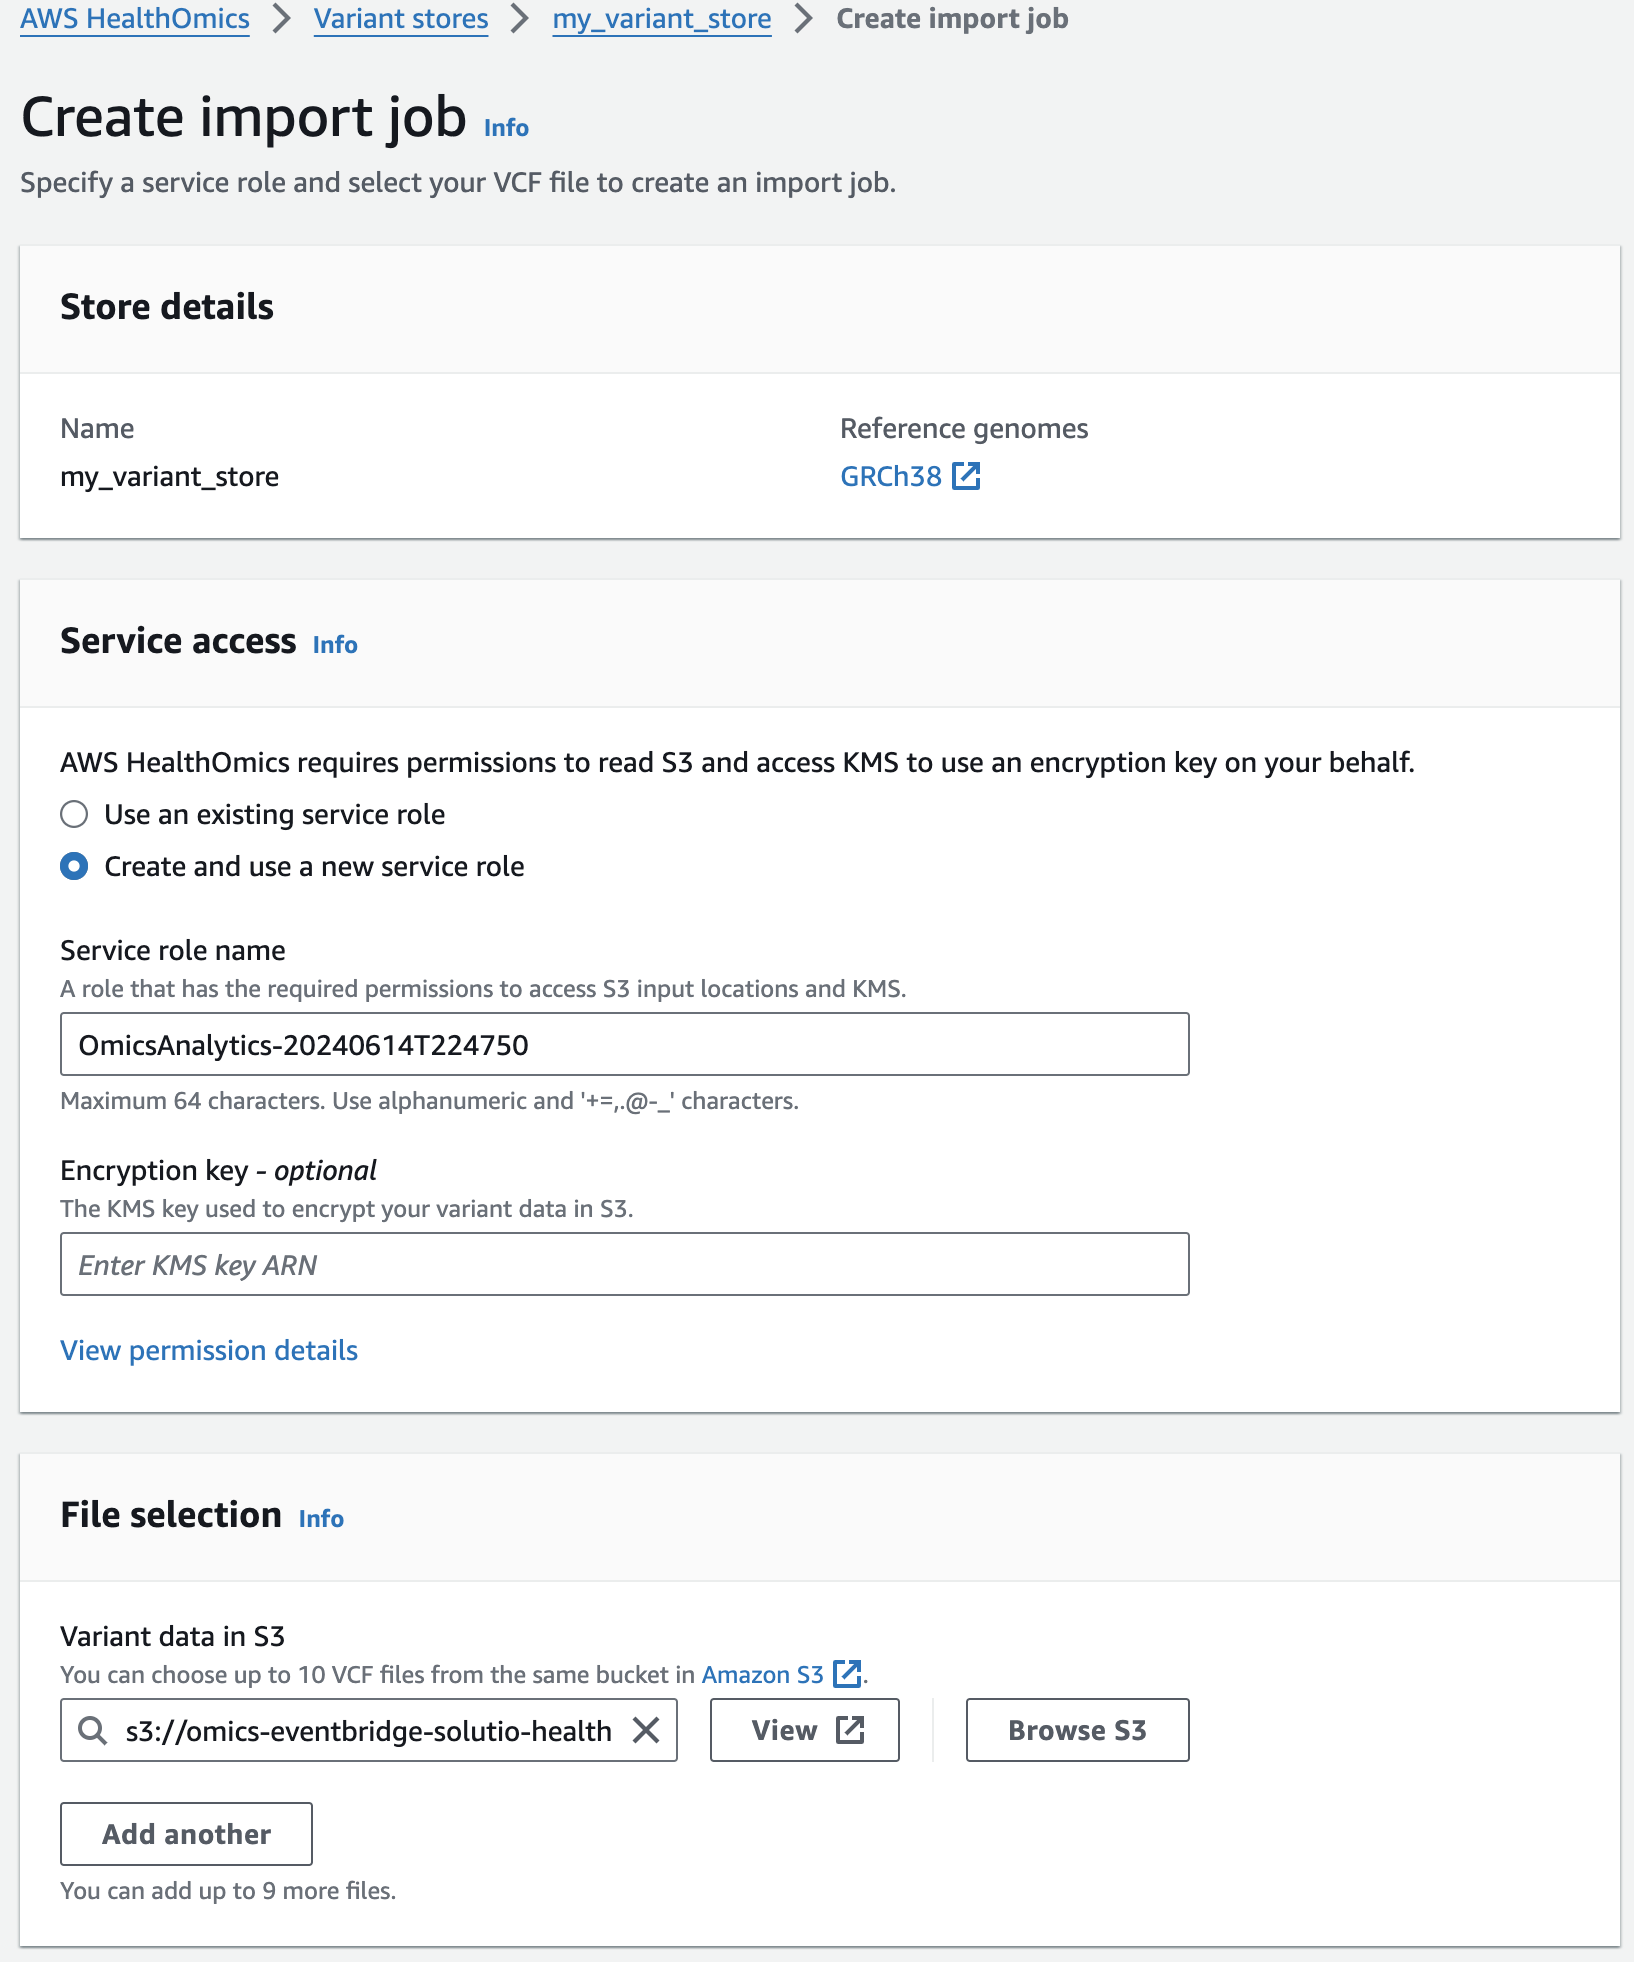
Next, you are going to start a VCF import job. To do this:
- From the AWS HealthOmics Console, navigate to Analytics > Variant stores
- Select the Name Variant store named omicsvariantstore1 (or the one you created above as appropriate)
- Select Import variant data. If this option isn't available select Actions > Import.
- Select Create and use a new service role
- For Select variant data from S3 provide the following S3 URI:
아래 s3 경로는 입력 VCF 파일의 S3 URI을 의미합니다.
s3://omics-eventbridge-solutio-healthomicsckaoutput6642-xbtuwqnxt8uw/outputs/9881593/out/output_vcf/NA12878.hg38.g.vcf.gz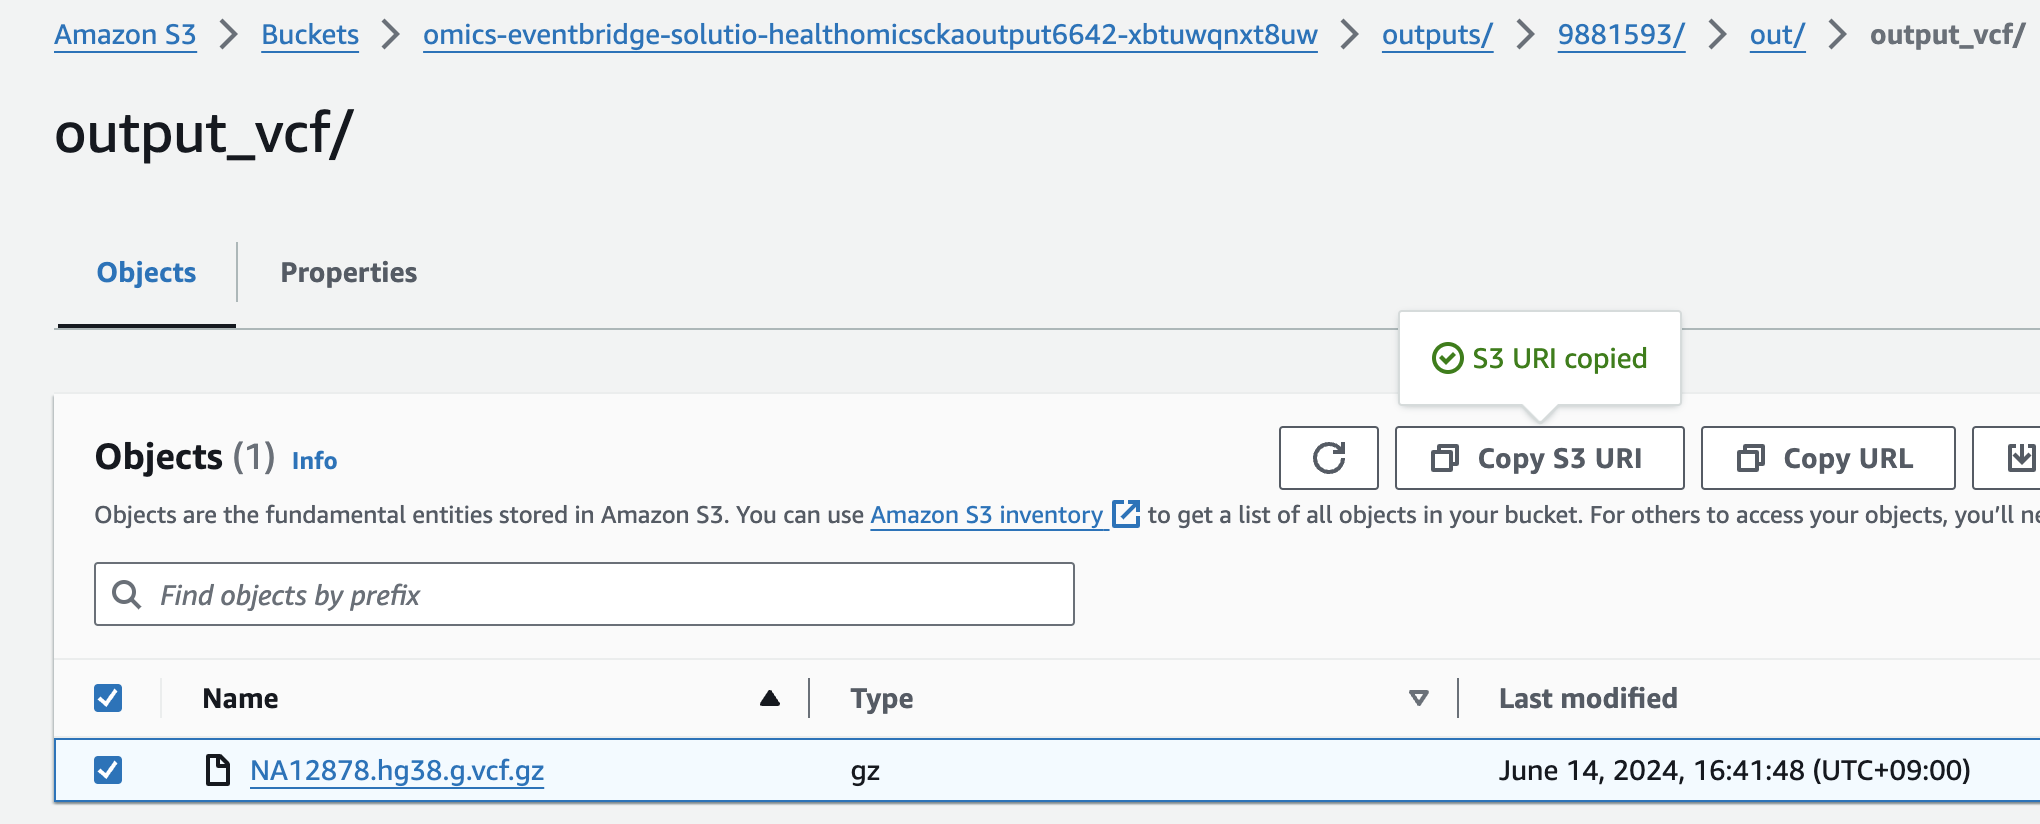
NOTE: The region will differ based on deployment region.
- Start the import with Create import job
You should now see something like this:
- 적당한 Service role 이 없을 경우 새로 생성하여 사용하는 옵션을 선택할 수 있습니다.
- 앞에서 설명한대로 입력하고자하는 VCF 파일의 S3 경로를 작성합니다.
콘솔에서 VCF Import작업시 제출되었음을 확인할 수 있습니다.

Annotation stores
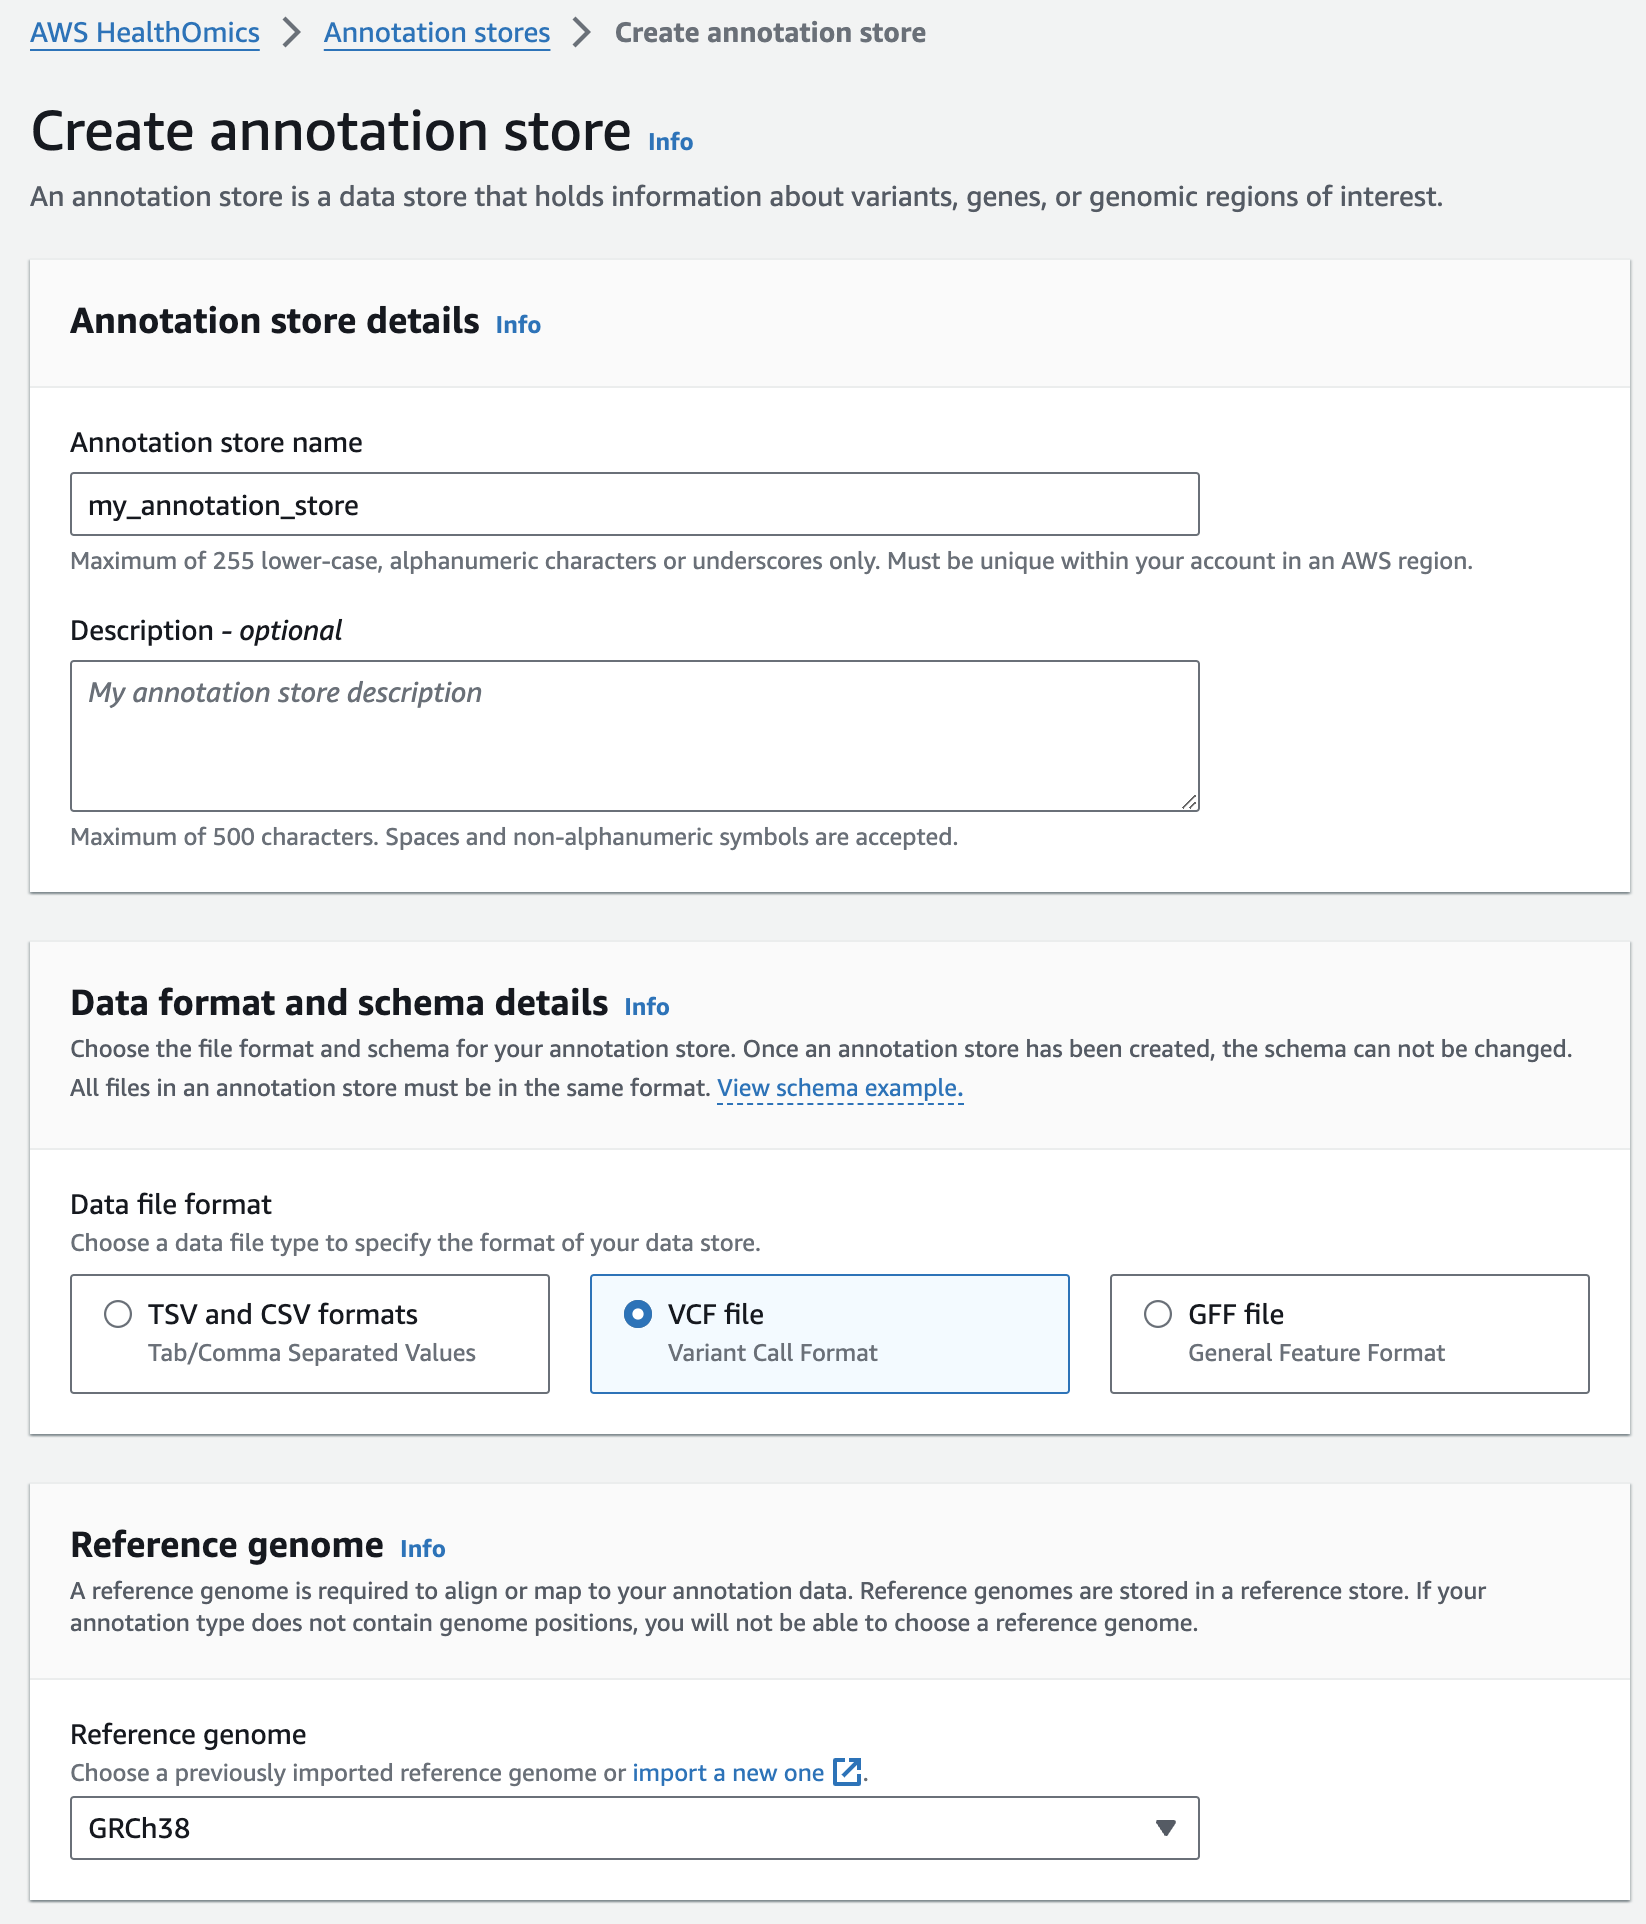
주석 스토어 생성
- From the AWS HealthOmics Console, navigate to Analytics > Annotation stores
- Select Create annotation store
- For Variant store name provide "my_annotation_store".
- For Data file format select VCF file
- For Reference genome select "GRCh38" (this is a pre-provisioned reference, but you can alternatively select the reference you imported in the Reference Store part of the workshop)
- Finish with Create annotation store
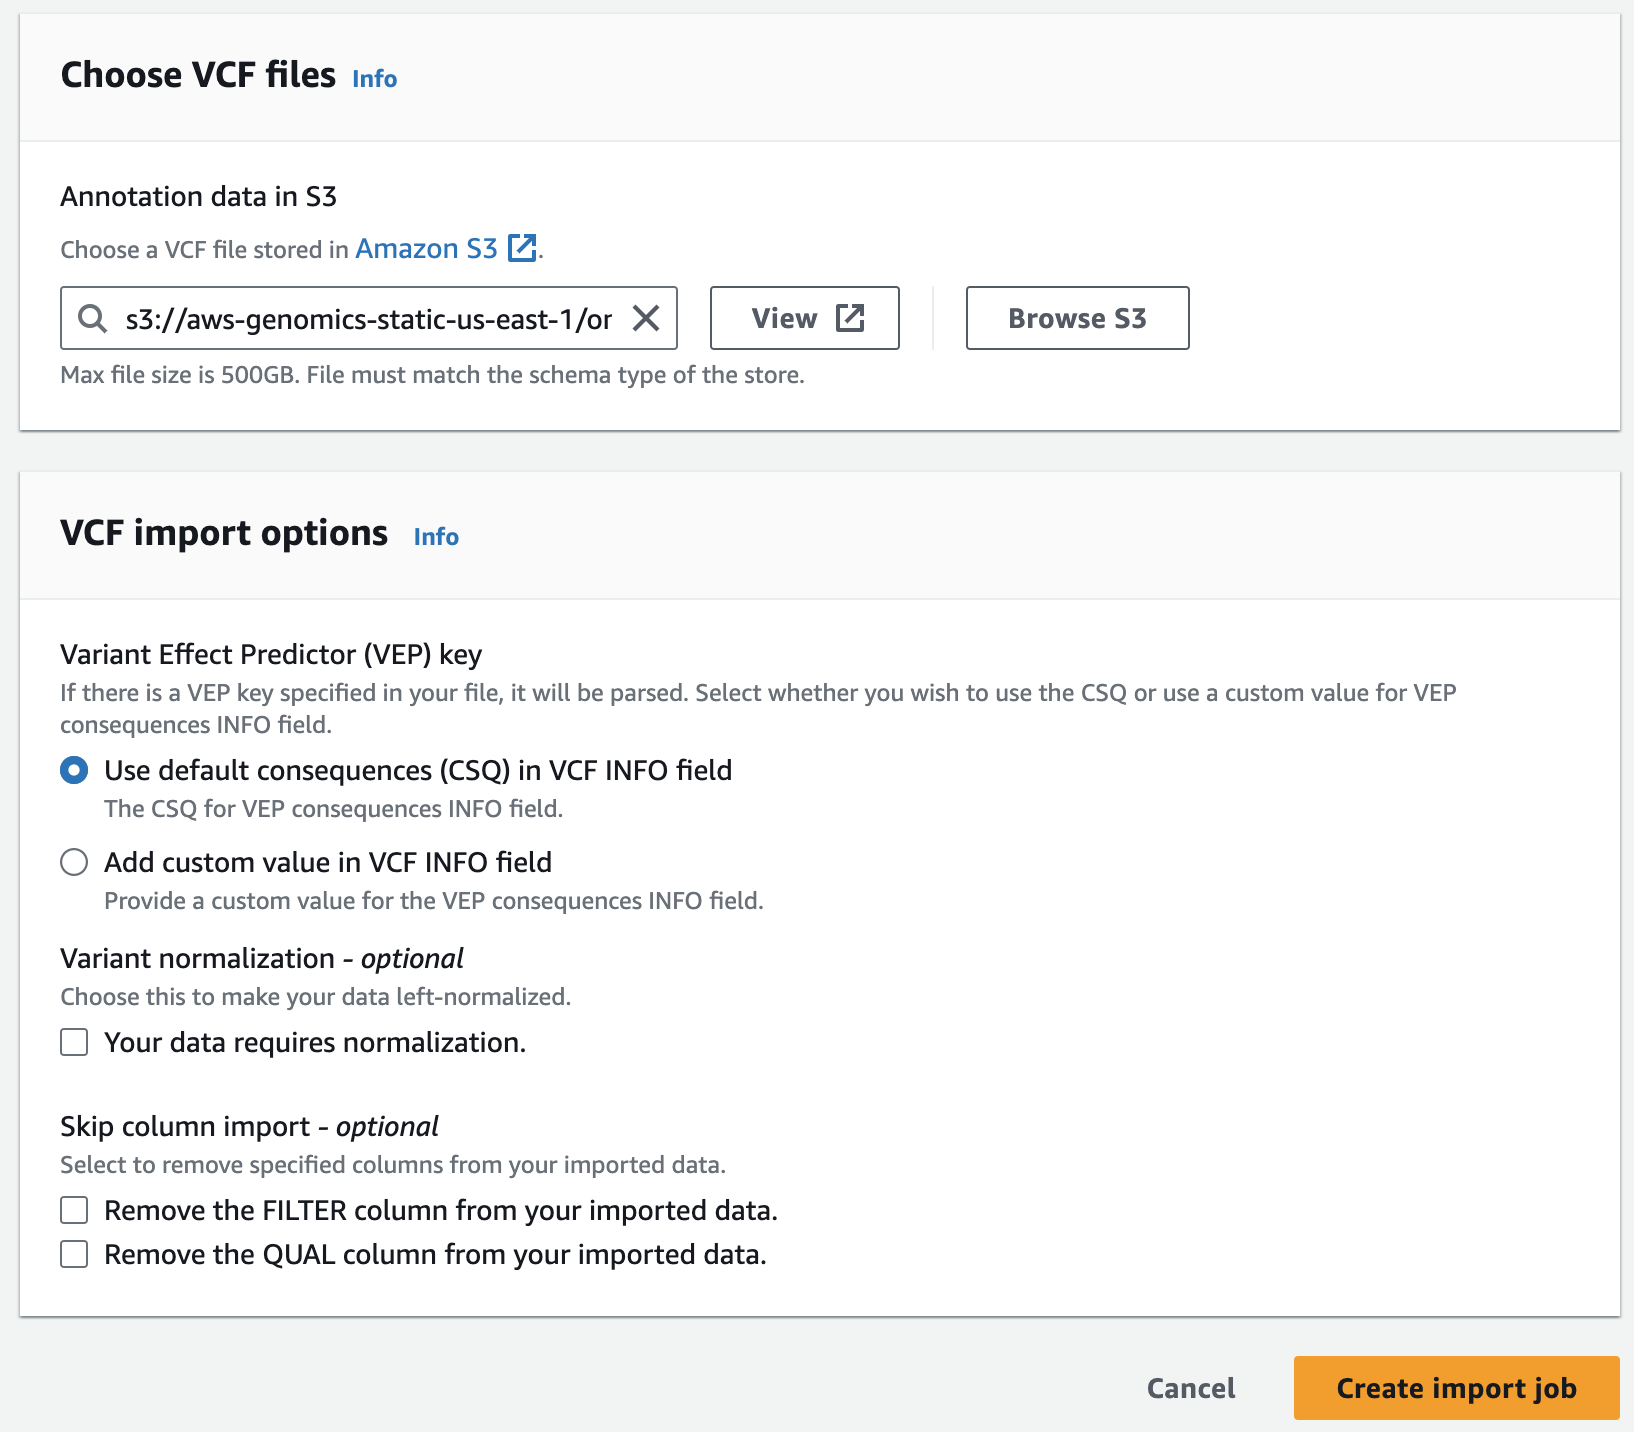
주석 스토어에 VCF 파일 가져오기
Next, you are going to start an annotation import job to import ClinVar annotations in VCF format into the pre-provisioned store.
s3://aws-genomics-static-<aws-region>/omics-workshop/data/annotations/clinvar.vcf.gz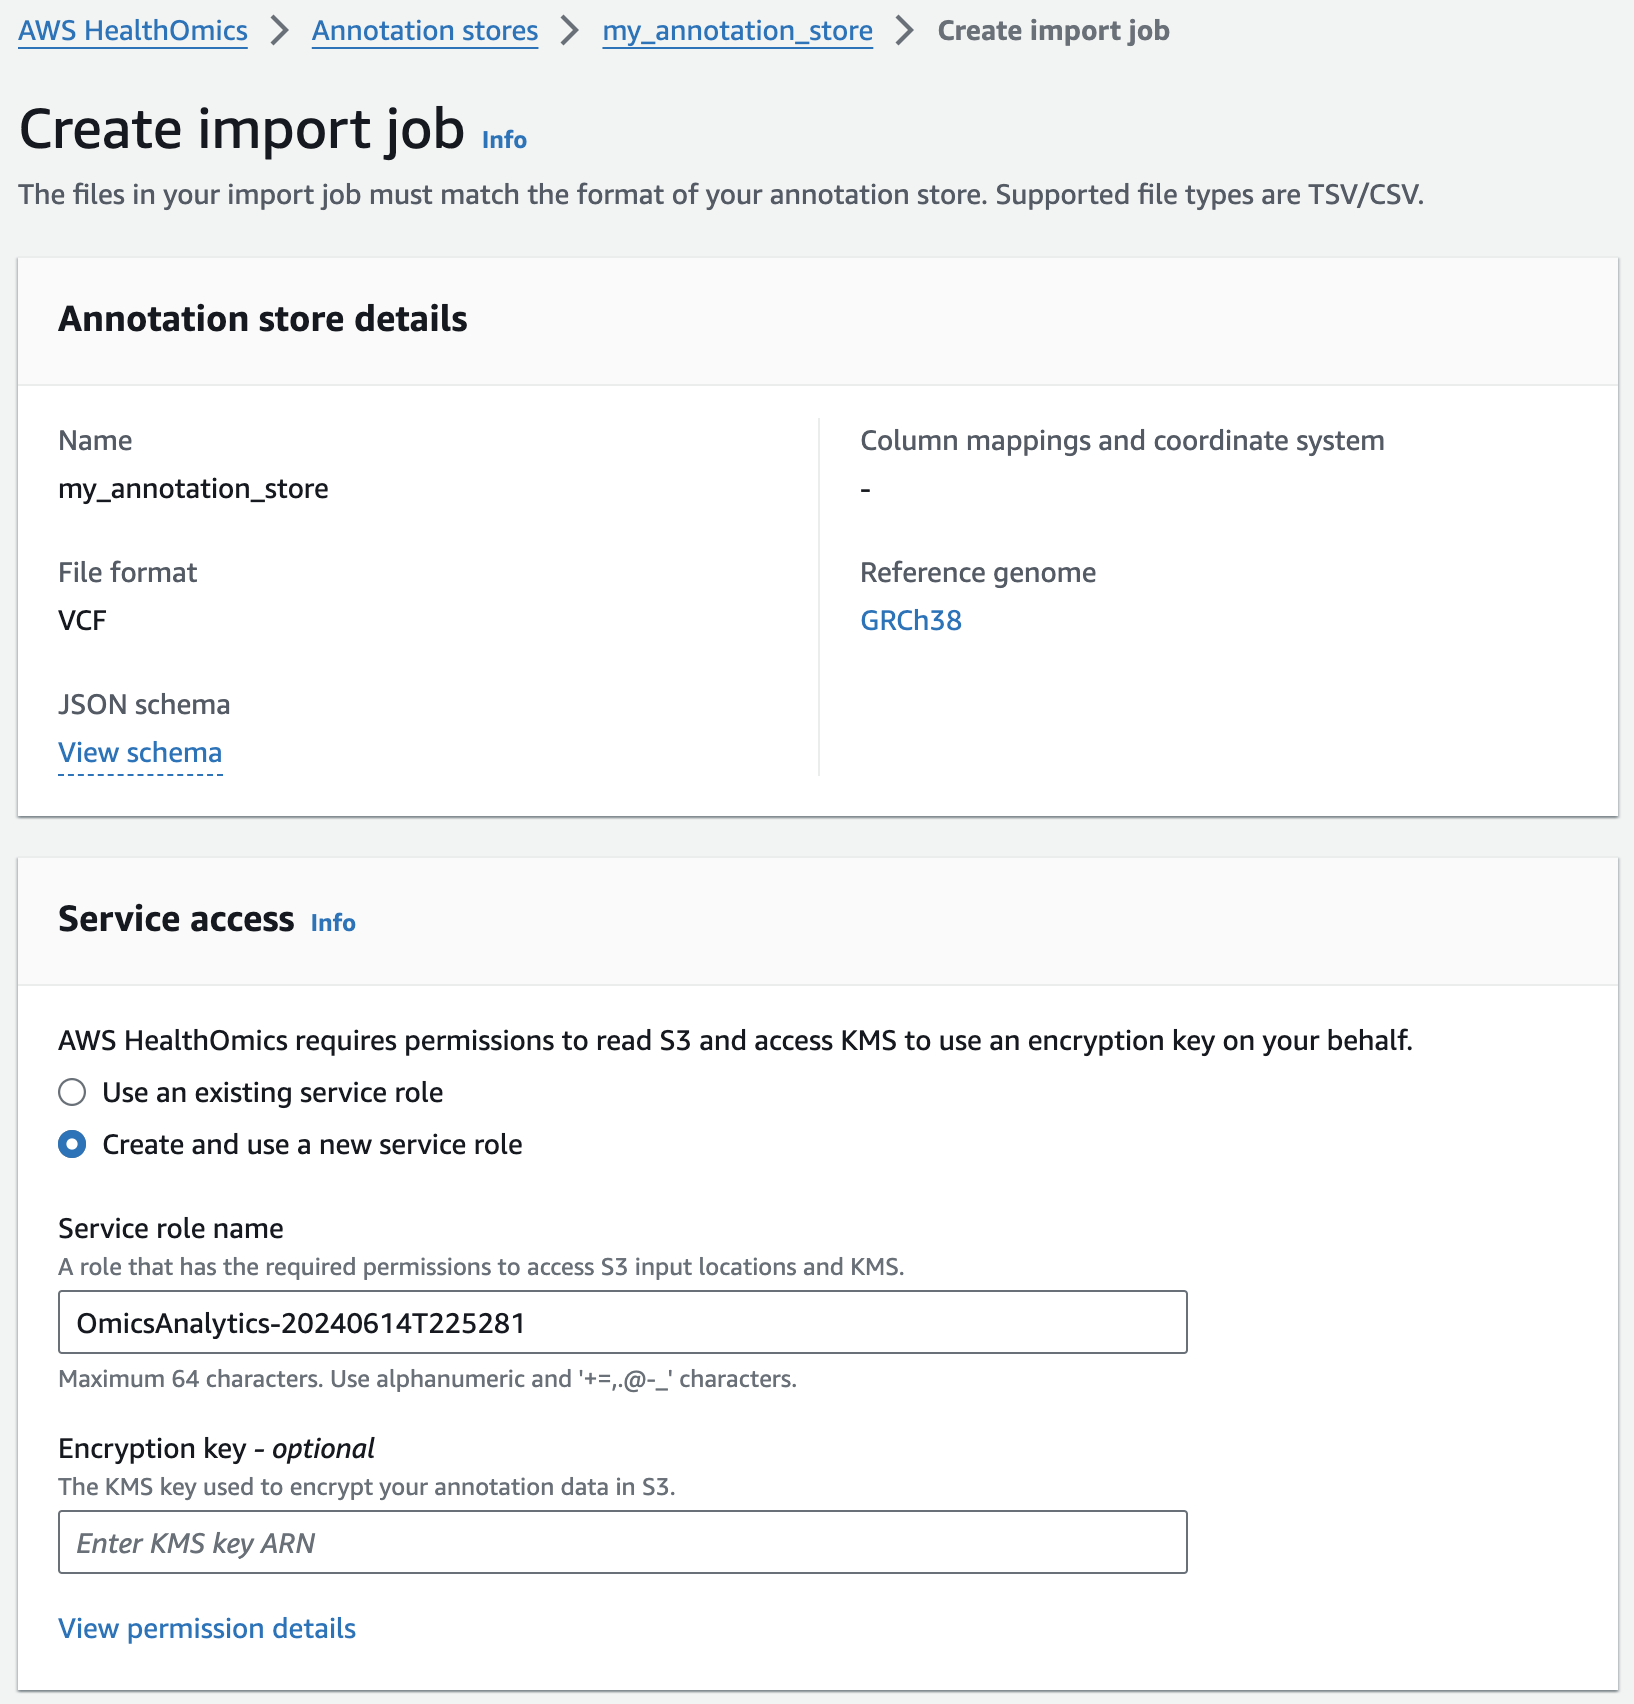
Querying variants and annotations
이전 섹션에서 가져온 variant 및 annotation 데이터는 확장 가능한 쿼리가 가능한 열 형식의 저장소(Apache Parquet)로 변환됩니다. 데이터는 AWS 레이크 형성에서 공유 데이터베이스 및 테이블로 사용할 수 있습니다. 데이터를 쿼리하기 전에 Lake Formation 리소스 링크를 통해 액세스 권한을 제공하고 Athena 작업 그룹을 만드는 등 몇 가지 설정 단계를 수행해야 합니다.
AWS Lake Formation 서비스 셋업
Lake Formation Data Lake administrators are users and roles with permissions to create resource links (covered in the section below). In a real-world scenario, you would only need to setup data lake administrators once per account per region, or you would have IT support staff that serve this role.
For this workshop, you will need to verify that your current user role is a data lake administrator.
2. If you see the following screen, select 기타Get 참고started:
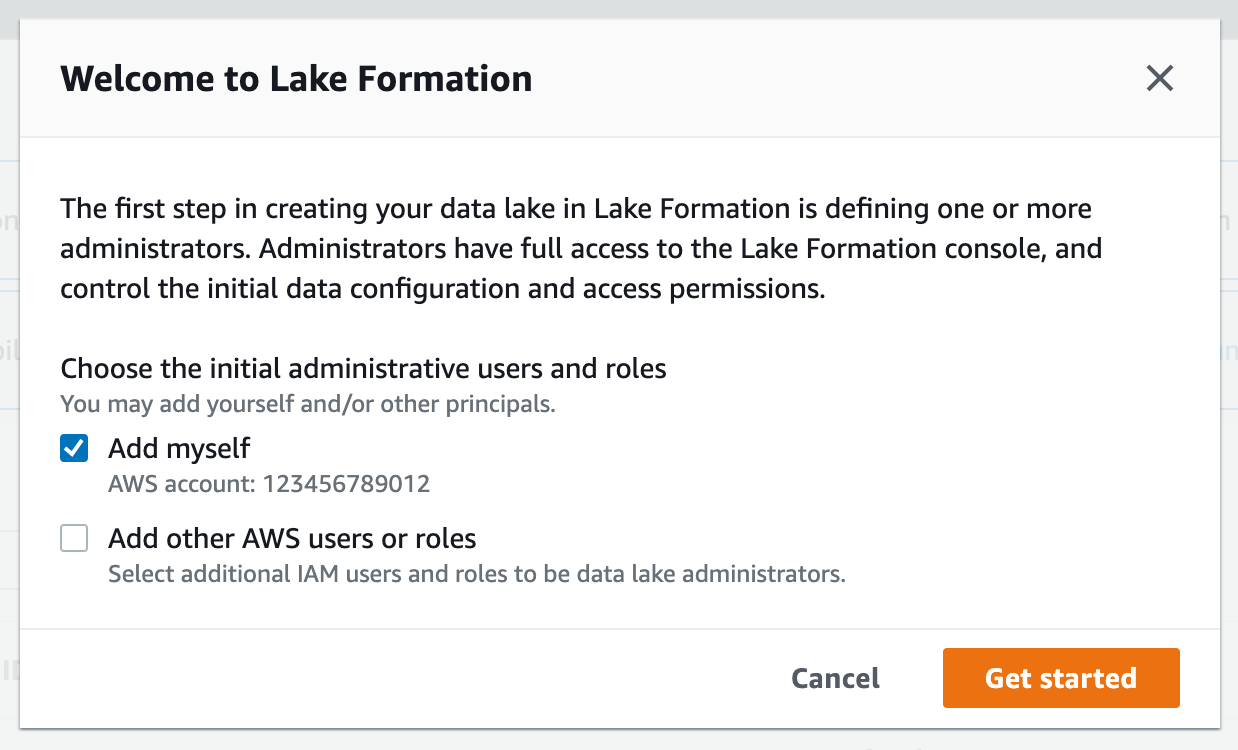

4. If WSParticipantRole is not listed as a data lake administrator, select Choose administrators and then choose WSParticipantRole under IAM uesrs and roles. Then select Save to add the role as a Data lake administrator.
데이터베이스 생성
Let's create a database that we'll use as a virtual container for our variants and annotations.
1. AWS Lake Formation 콘솔에서 Databases 로 들어갑니다.
2. Select Create Database.
3. For Name provide omicsdb. 
4. Accept all other defaults and finish with Create database.
리소스 링크 생성
Resource links connect resources shared by HealthOmics Analytics to new or existing databases in your AWS Glue Data Catalog. For this workshop, we'll create resource links within the omicsdb you created above that point to the Variant and Annotaiton stores you created in previous sections.
1. AWS Lake Formation 콘솔에서 Tables 메뉴로 진입합니다.
2. 앞에서 만들었던 변이 스토어 이름을 검색한 뒤 선택하고 새로운 리소스 링크를 만듭니다.
여기 예는 my_variant_store 입니다.
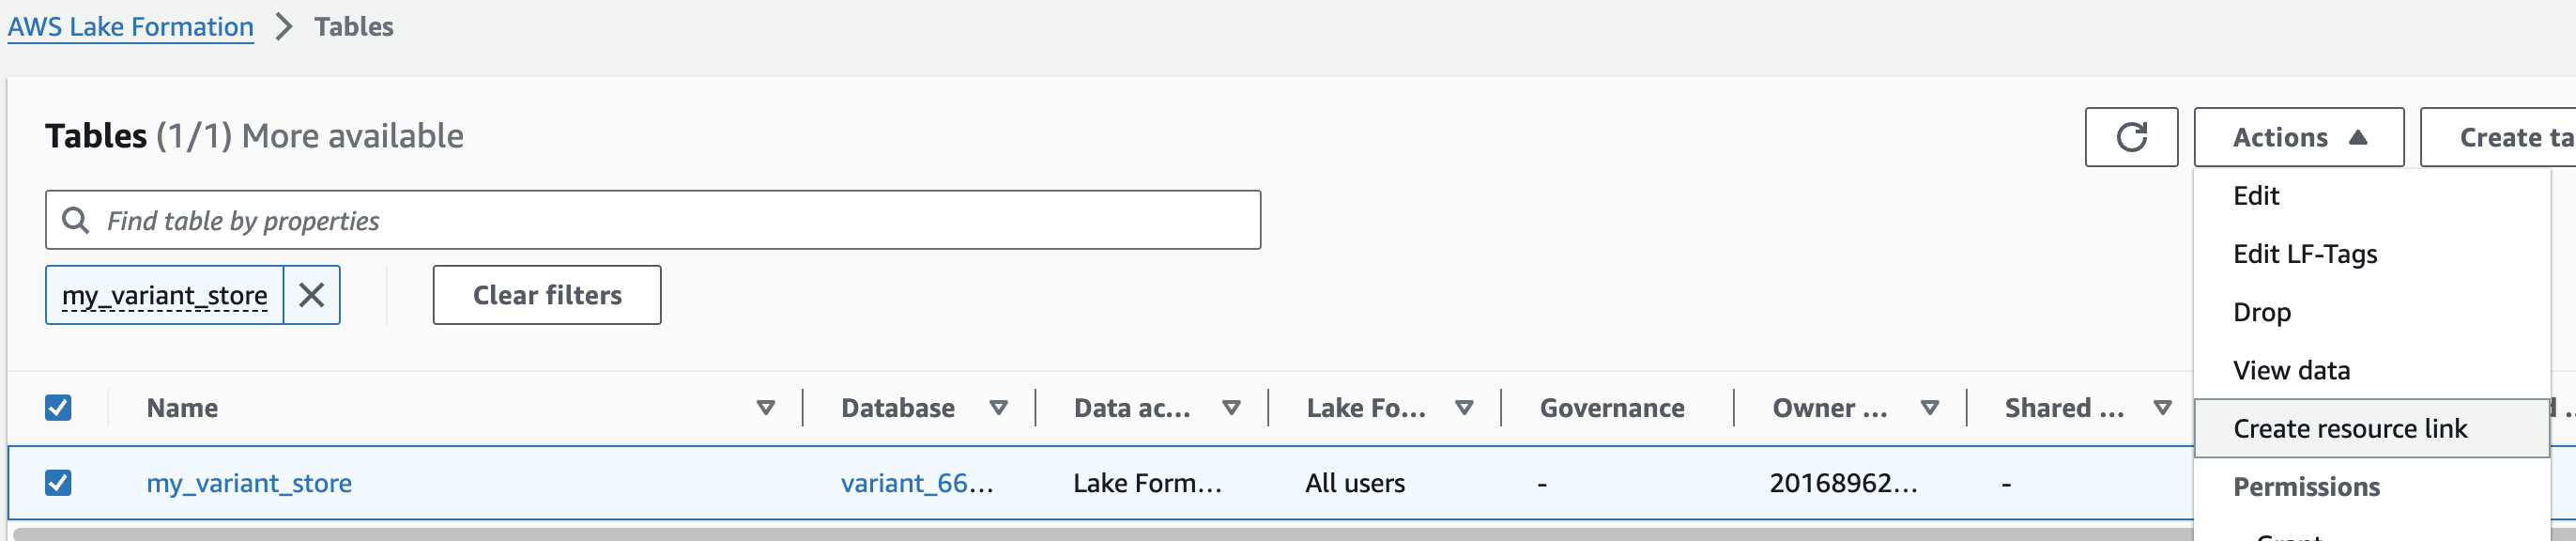
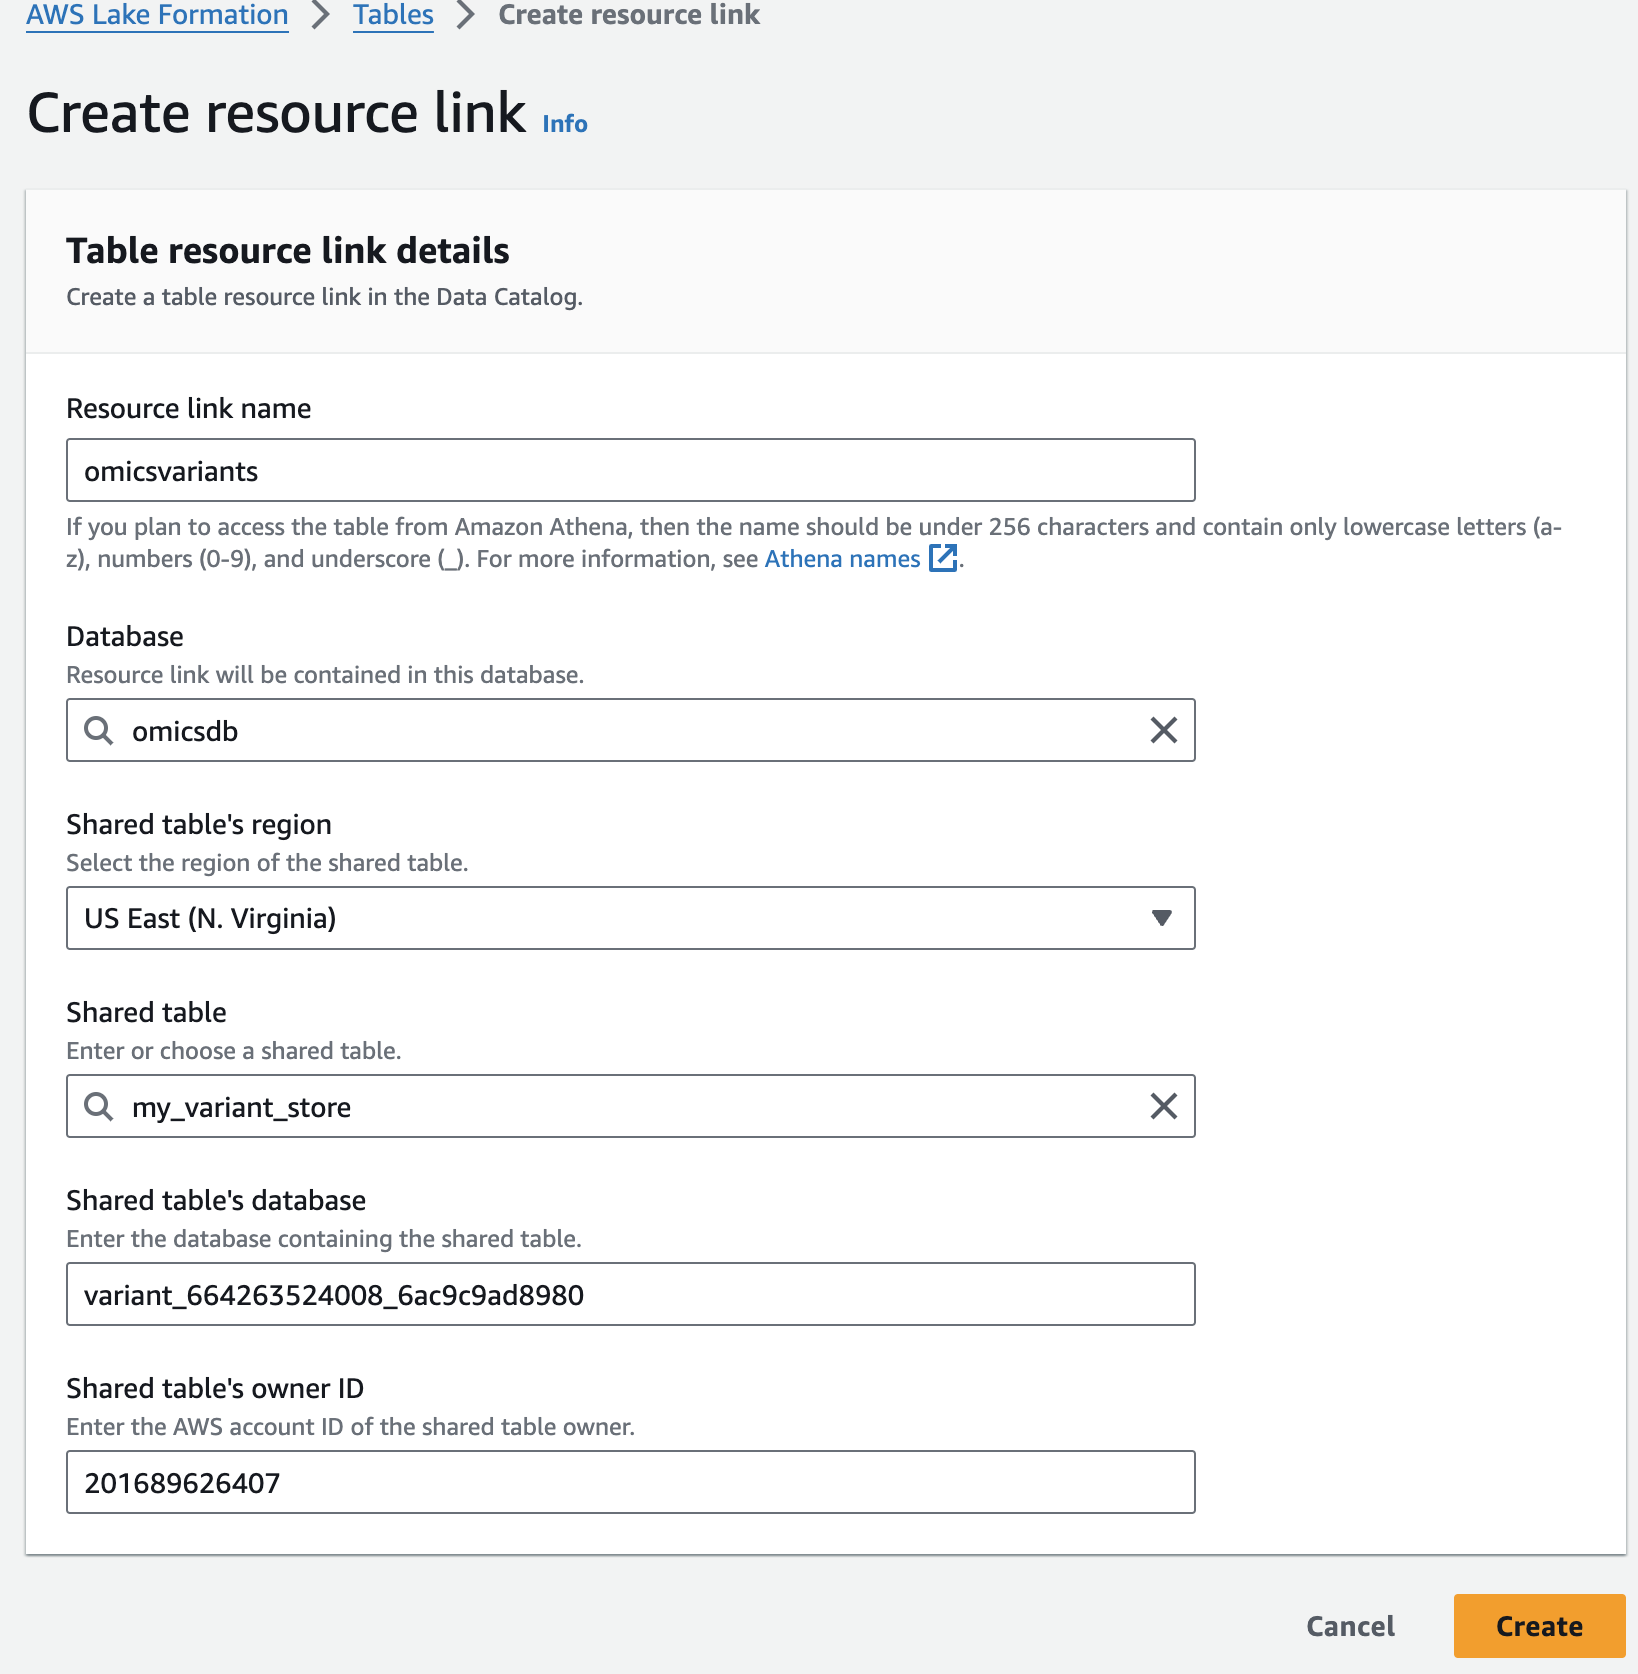
For Resource link name, provide omicsvariants.
For Database, provide omicsdb.
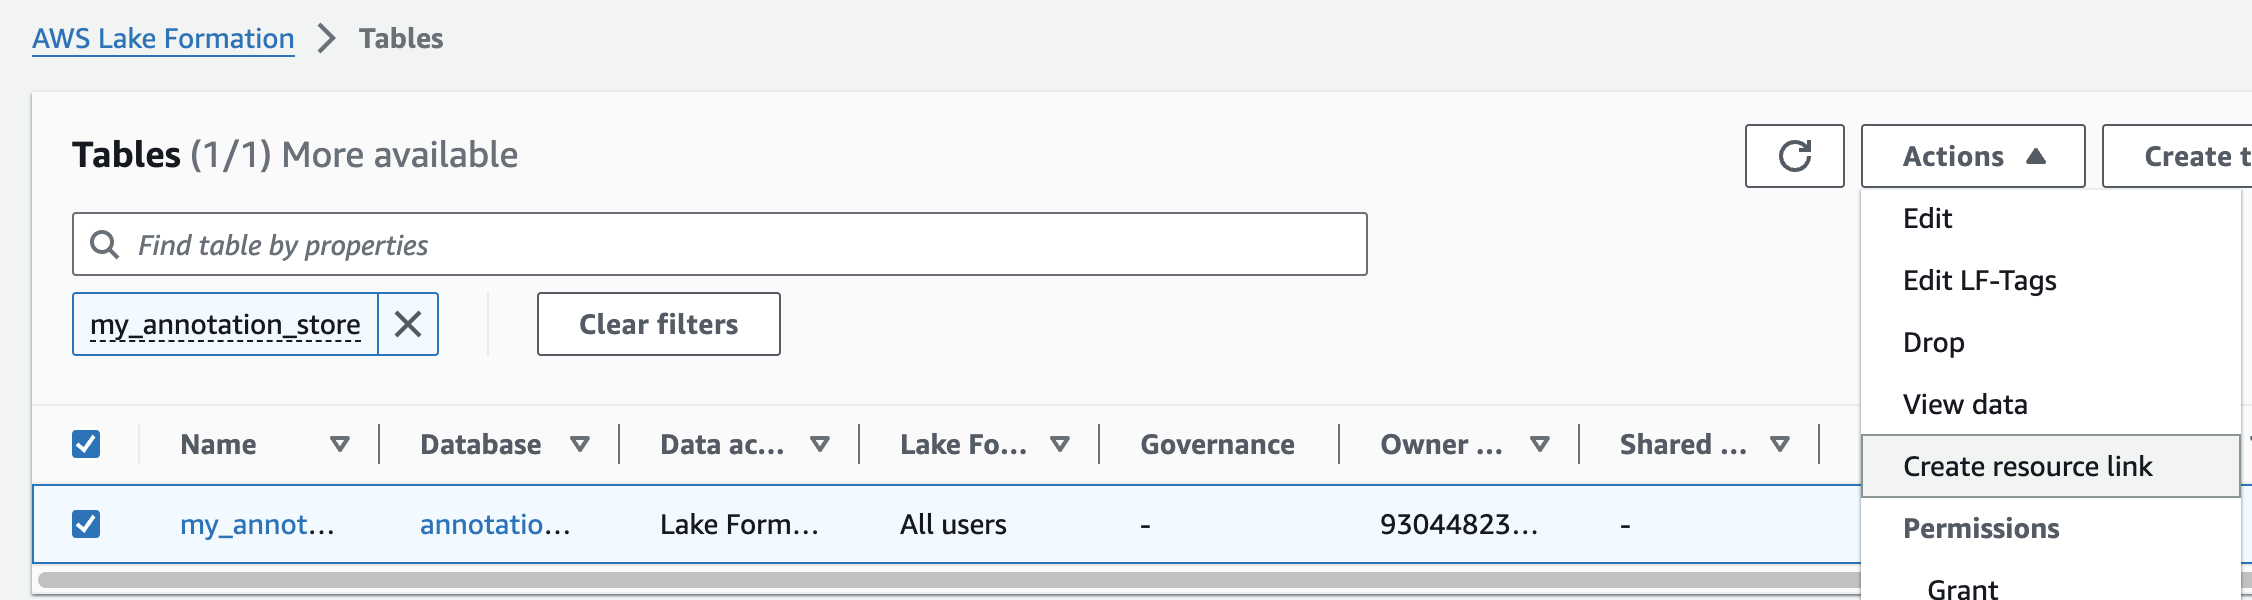
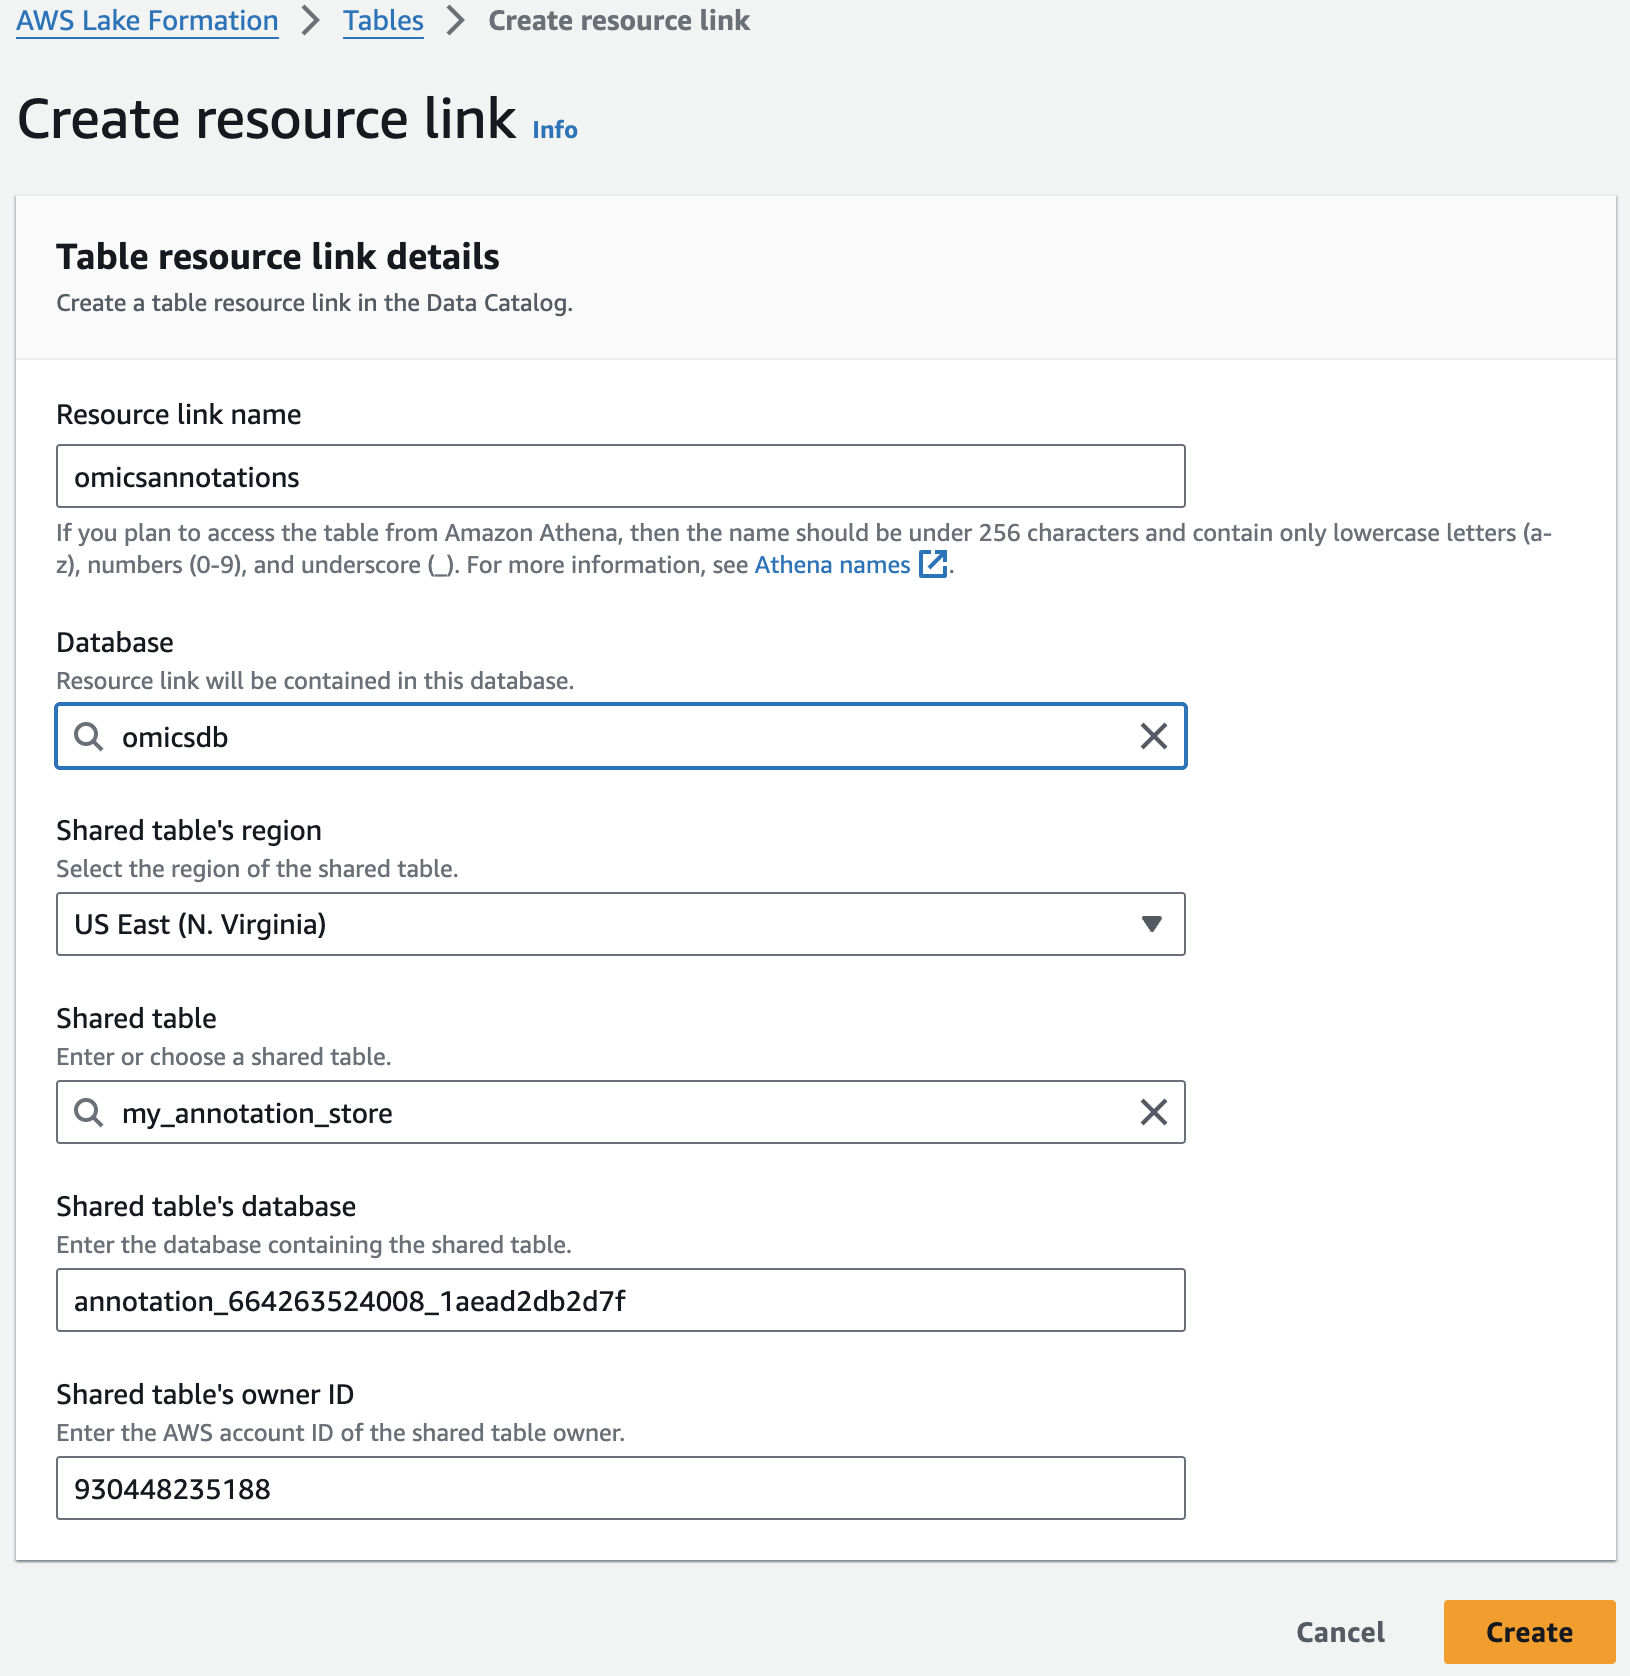
주석 테이블에 대해 위의 단계를 반복하여 omicsdb 데이터베이스에 omicsannotations라는 리소스 링크를 만듭니다.
Amazon Athena 셋업
쿼리 결과 디렉토리 지정

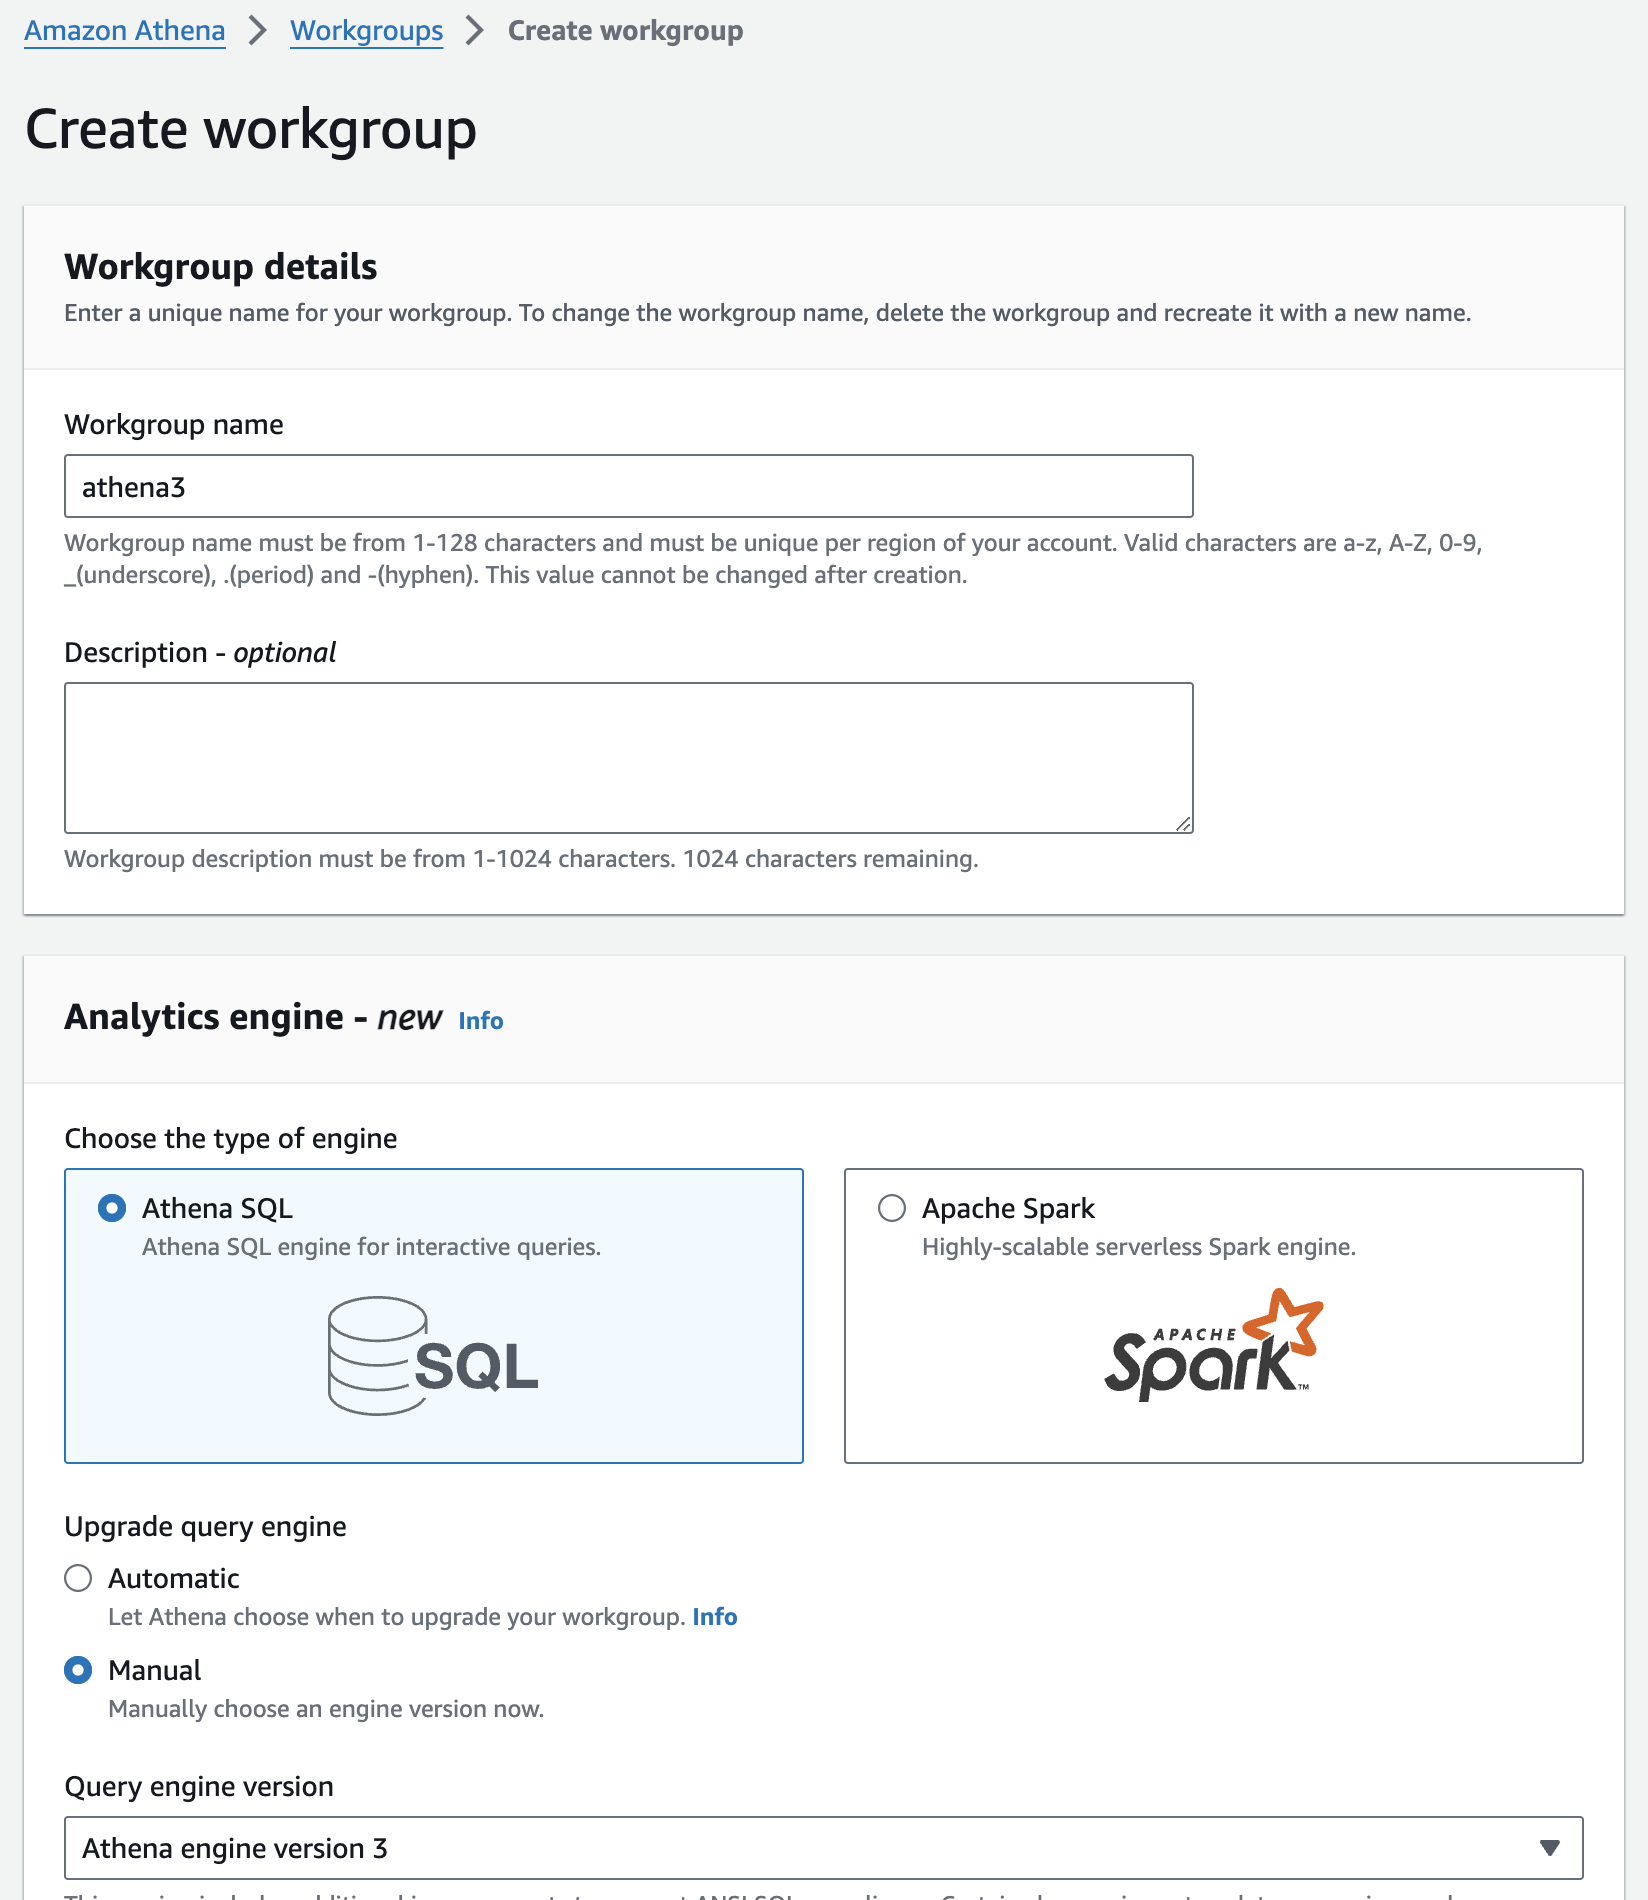
워킹 그룹 생성
Running queries - Amazon Athena
Now that we have Athena configured, let's run some queries.
간단한 쿼리
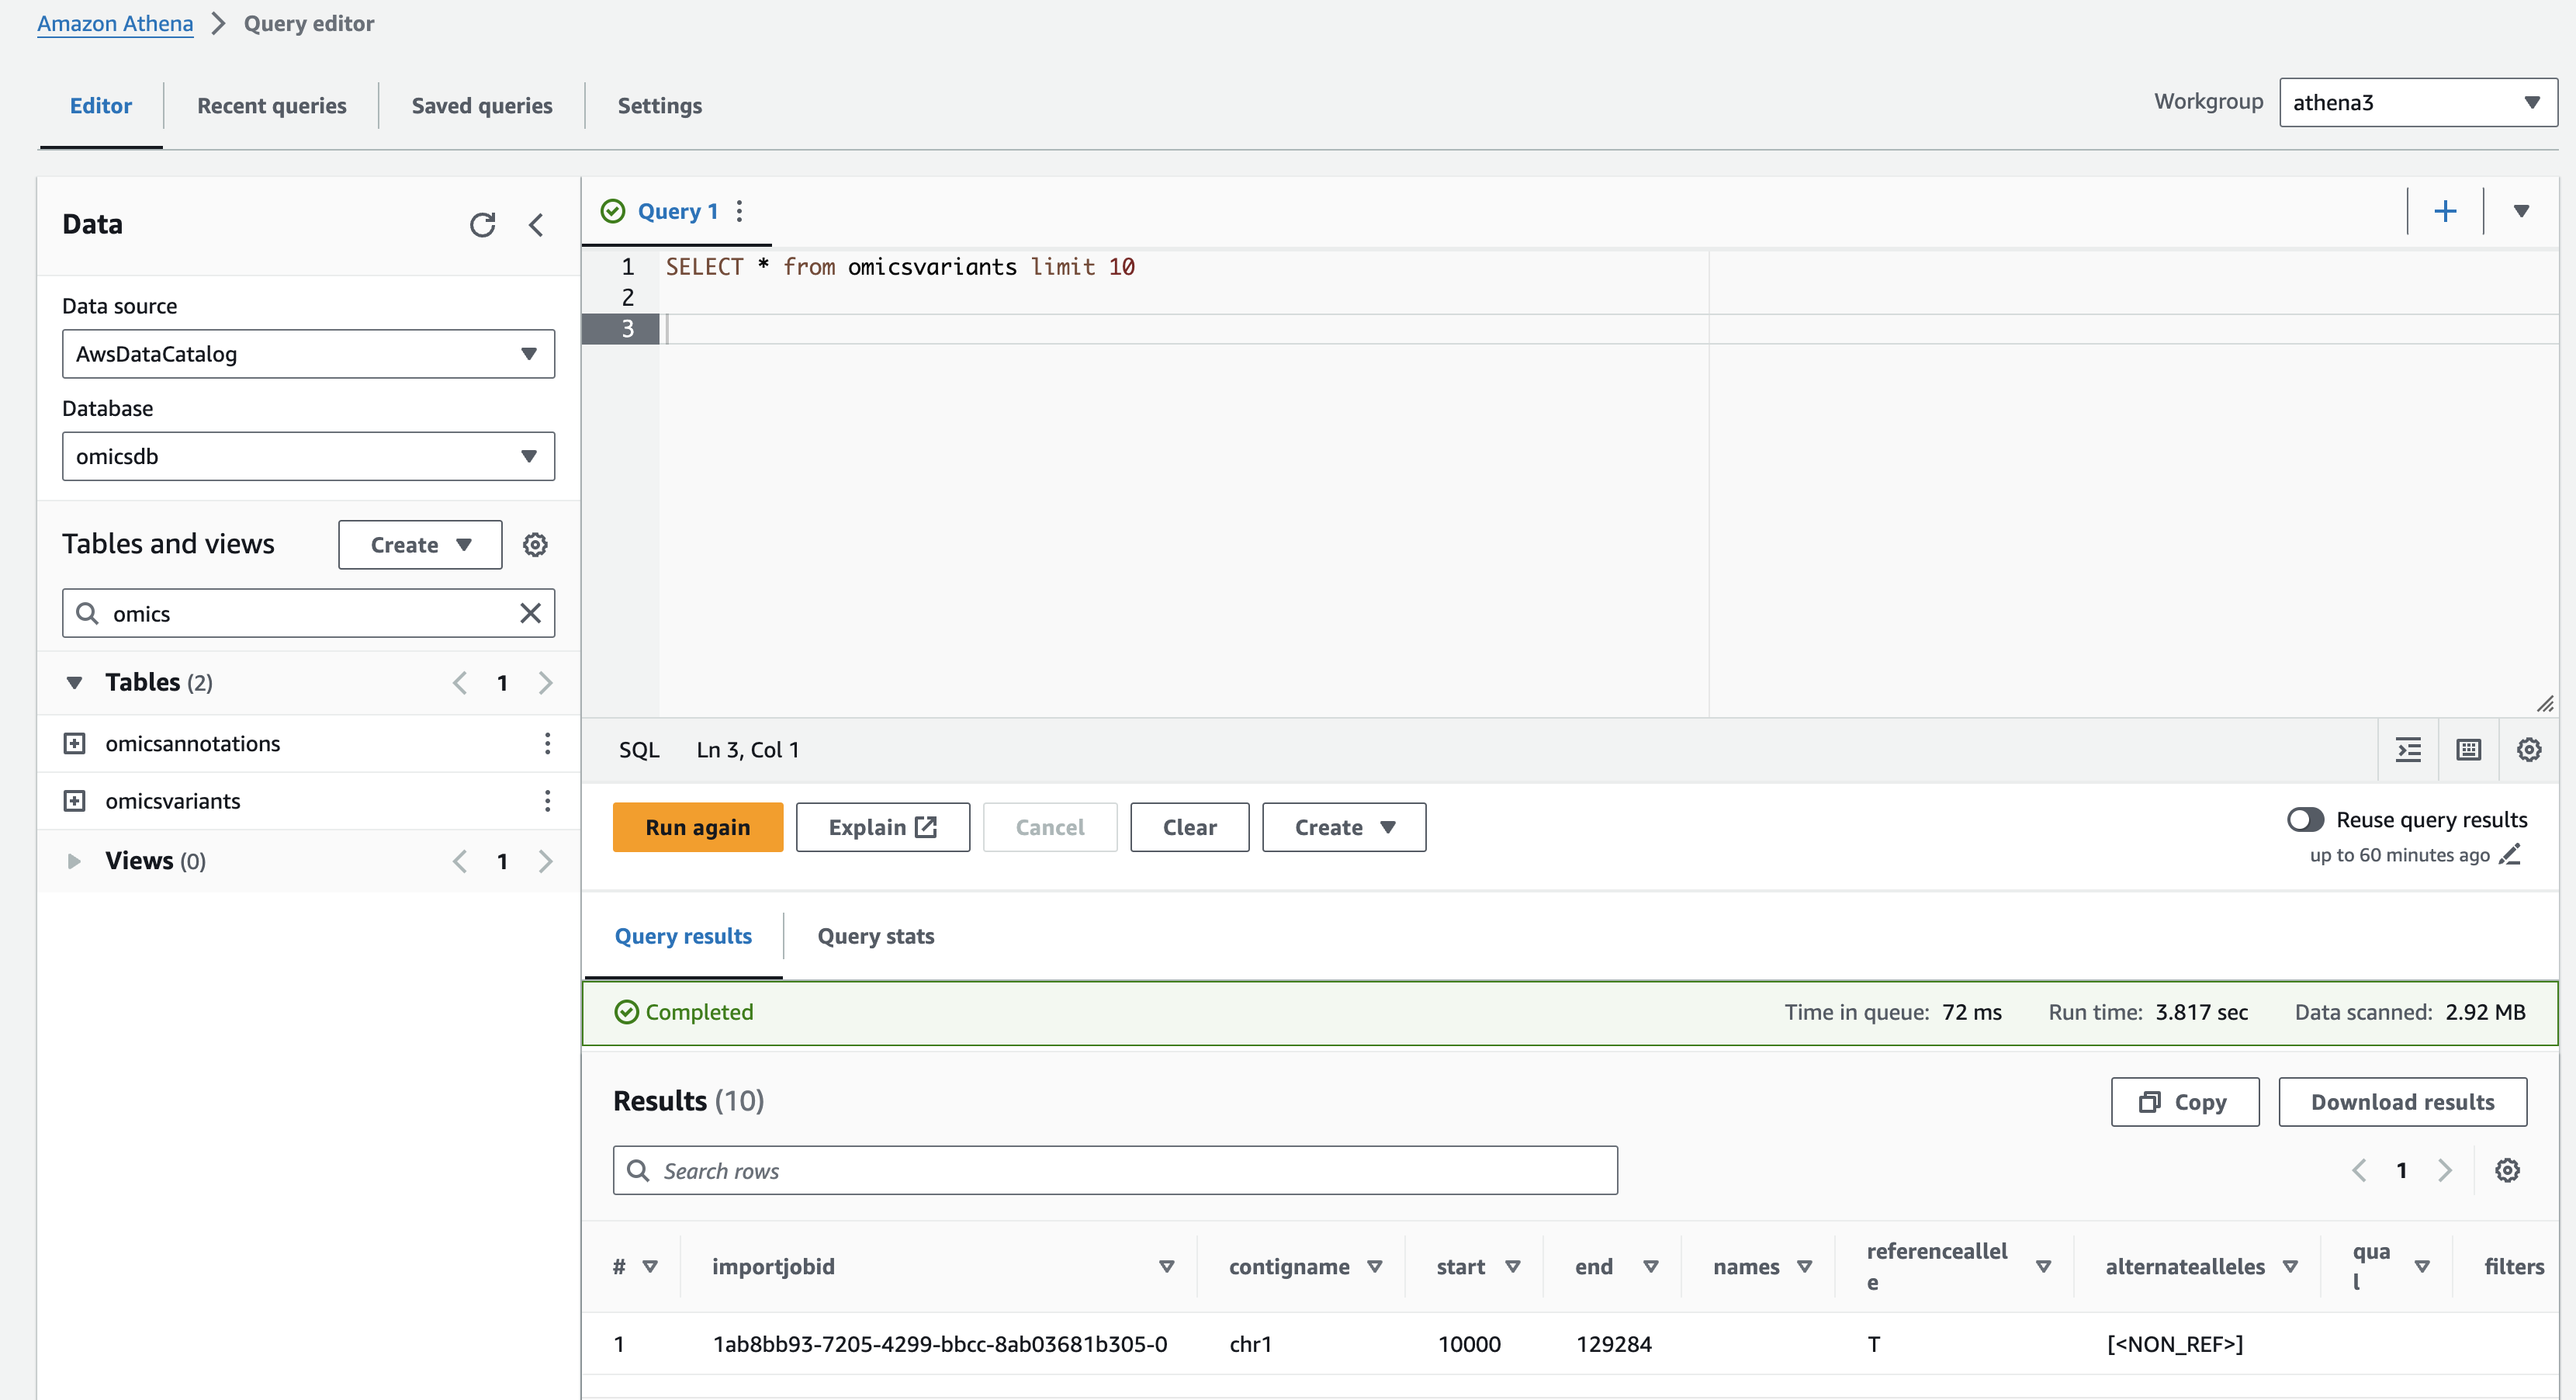
Preview the omicsvariants table, by running the following query:
SELECT * from omicsvariants limit 10Results should return in a few seconds and look like:
복잡한 쿼리
For a more complex query, you can run the following which displays variants with a 'Likely_pathogenic' clinical significance by joining ClinVar annotations to variants.
SELECT variants.sampleid,
  variants.contigname,
  variants.start,
  variants.referenceallele,
  variants.alternatealleles,
  variants.attributes AS variant_attributes,
  clinvar.attributes AS clinvar_attributes
FROM omicsvariants as variants
INNER JOIN omicsannotations as clinvar ON
  variants.contigname=CONCAT('chr',clinvar.contigname)
  AND variants.start=clinvar.start
  AND variants."end"=clinvar."end"
  AND variants.referenceallele=clinvar.referenceallele
  AND variants.alternatealleles=clinvar.alternatealleles
WHERE clinvar.attributes['CLNSIG']='Likely_pathogenic'
참고
- https://catalog.workshops.aws/amazon-omics-end-to-end/en-US/010-xp-console/300-omics-analytics
- https://github.com/vcflib/vcflib/tree/master
- https://github.com/Ensembl/ensembl-vep
- echtvar
- https://github.com/brentp/vcfanno